Visualforce Basics
These are technical notes I compiled while studying using Trailhead, Salesforce's free self-learning portal.
- Lightning Web Components are the preferred way to build UI with Salesforce
- Reference Migrate from Visualforce to Lightning Web Components trail
Get Started with Visualforce
Describe what Visualforce is and what it’s used for. List three or more places where Visualforce can be used.- Introduction to Visualforce
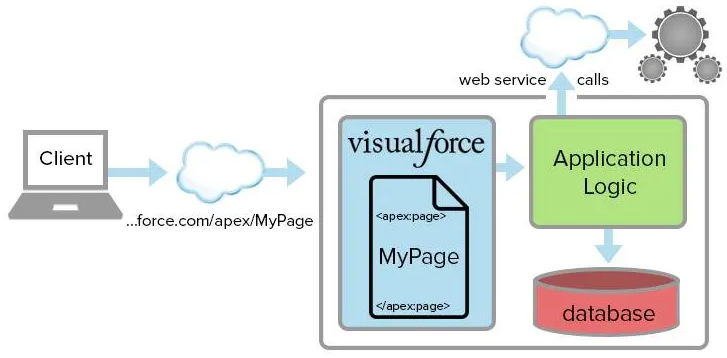
- Visualforce is a web development framework that enables developers to build sophisticated, custom user interfaces for mobile and desktop apps that can be hosted on the Lightning platform
- Visualforce enables developers to extend Salesforce
- Visualforce app development will be familiar to anyone who has built web apps - pages are built by composing components, HTML, and optional styling elements
- Visualforce can integrate with any standard web technology or JavaScript framework to allow for a more animated and rich user interface
- Each page is accessible by a unique URL
- When someone access a page, the server performs any required data processing, renders the page into HTML, and returns the results to the browser
- An Example Visualforce Page
- The following does a lot for 14 lines of markup:
- Connects to Visuaforce standard controller
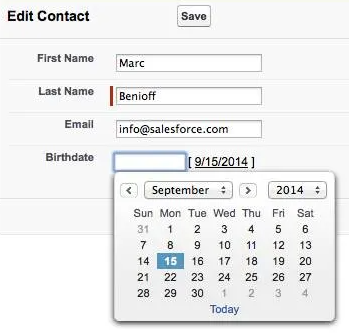
- When accessed without a record ID, page displays a blank data entry form. Clicking Save creates a new record.
- When accessed with a record ID, page looks up up the data for that contact record and displays it in an editable form. Clicking Save writes the changes back to the database.
- Input validation is enforced: email field data need to resemble emails, date field displays date widget
- Save button calls the save action method, one of the standard actions provided by the standard controller
- The following does a lot for 14 lines of markup:
<apex:page standardController="Contact" >
    <apex:form >
        <apex:pageBlock title="Edit Contact">
            <apex:pageBlockSection columns="1">
                <apex:inputField value="{!Contact.FirstName}"/>
                <apex:inputField value="{!Contact.LastName}"/>
                <apex:inputField value="{!Contact.Email}"/>
                <apex:inputField value="{!Contact.Birthdate}"/>
            </apex:pageBlockSection>
            <apex:pageBlockButtons >
                <apex:commandButton action="{!save}" value="Save"/>
            </apex:pageBlockButtons>
        </apex:pageBlock>
    </apex:form>
</apex:page>
- Where You Can Use Visualforce - at least 7 ways:
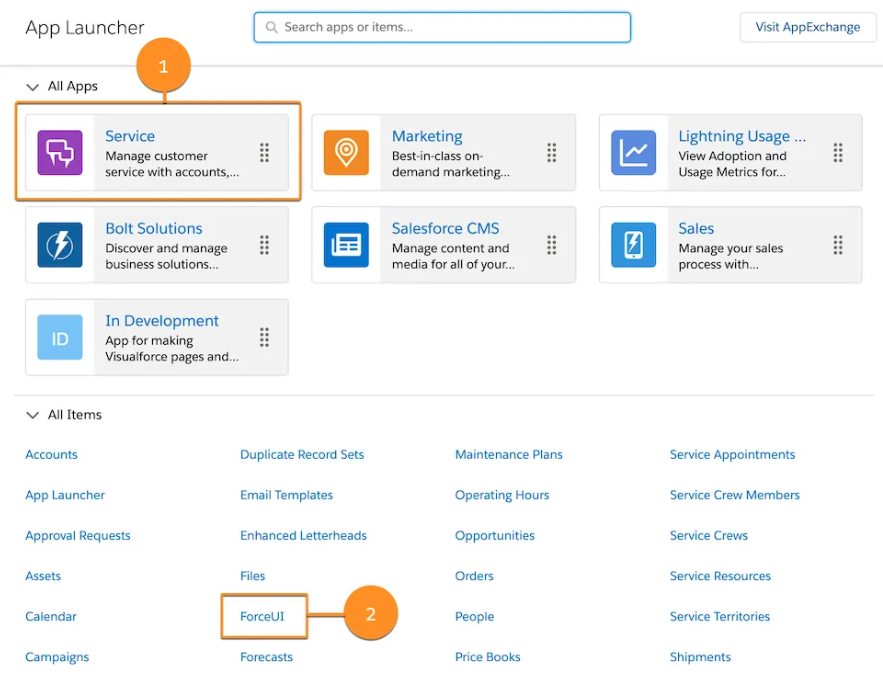
- Open a Visualforce Page from the App Launcher
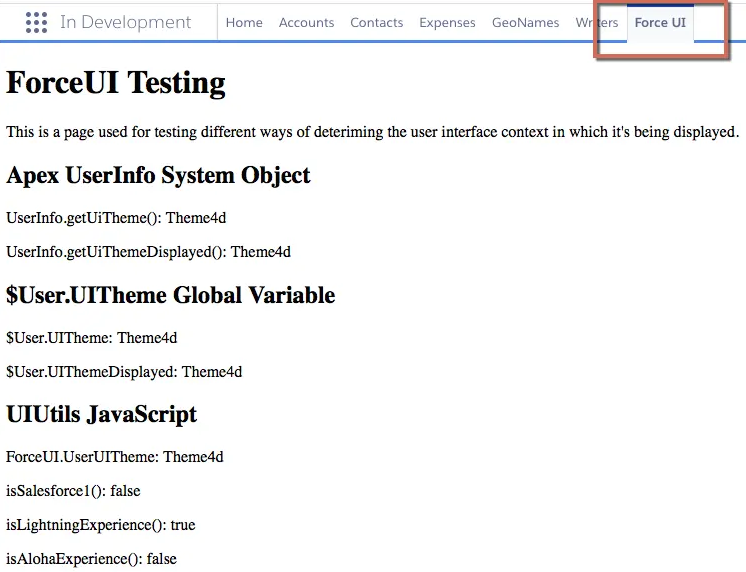
- Add a Visualforce Page to the Navigation Bar
- Display a Visualforce Page within a Standard Page Layout
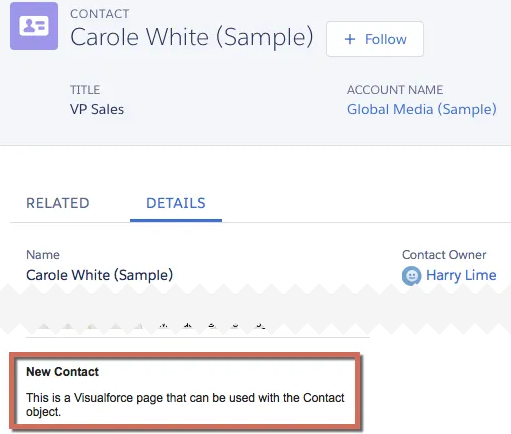
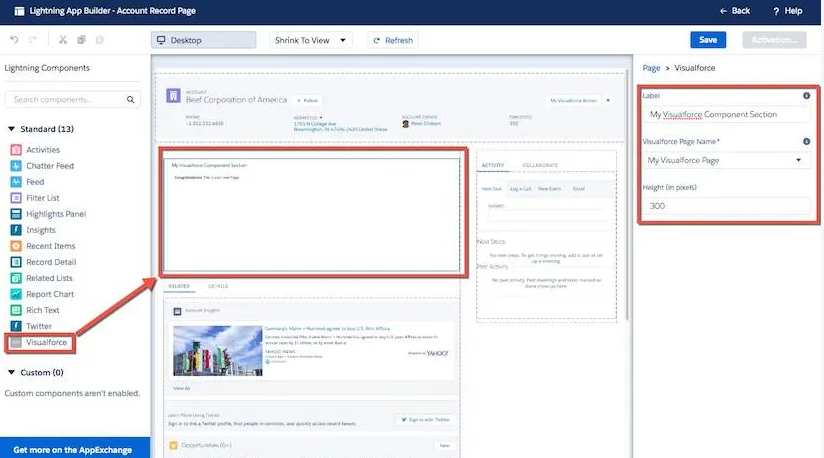
- Add a Visualforce Page as a Component in the Lightning App Builder
- Launch a Visualforce Page as a Quick Action

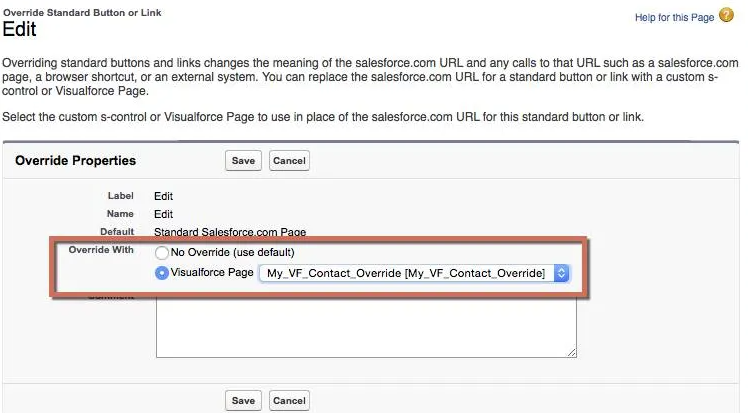
- Display a Visualforce Page by Overriding Standard Buttons or Links
- Display a Visualforce Page Using Custom Buttons or Links
Create & Edit Visualforce Pages
Explain what a Visualforce page is and describe its key attributes. List and open existing Visualforce pages in your organization. Create and edit a Visualforce page using the Developer Console. Identify, add, and customize Visualforce tags and attributes in the editor.- Introduction to Creating Visualforce Pages
- Visualforce pages are basic building blocks for application developers
- Similar to a standard web page, but includes features to access/display/update Salesforce orgs' data
- Pages are referenced and invoked via a unique URL, just like on a traditional web server
- Visualforce uses a tag-based markup language similar to HTML
- Each tag corresponds to a coarse or fine-grained UI component. Ex: page section, list view, individual field
- Nearly 150 built-in components
- Includes a way for developers to create their own component
- Can be freely mixed with HTML, CSS, and JavaScript libraries
- Several ways to view, create, and edit Visualforce pages directly in Salesforce
- Visualforce pages are basic building blocks for application developers
- Create Visualforce Pages in the Developer Console
- Open Developer Console, then File > New > Visualforce Page
- Save with File > Save
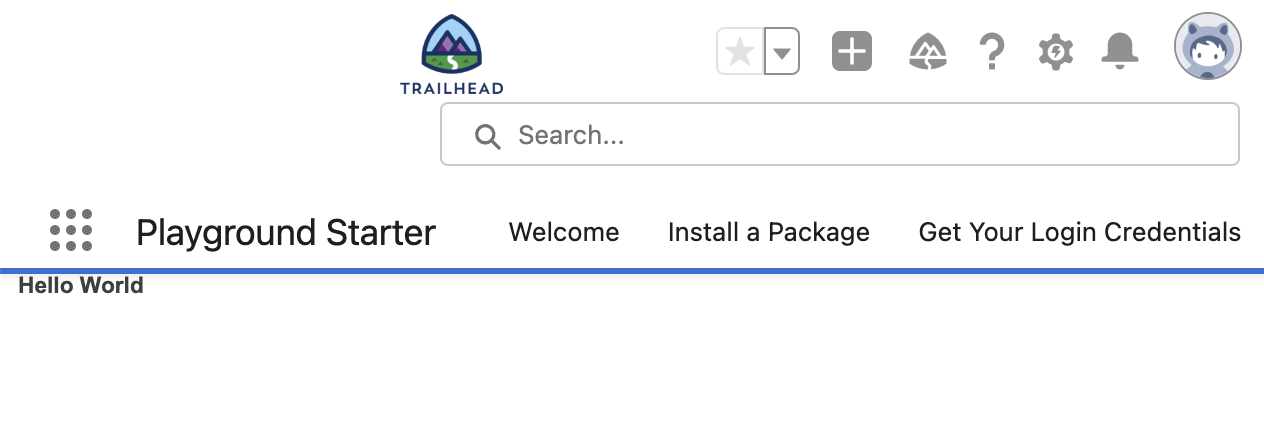
- To view rendered page, click Preview
- Note this does not show Salesforce styling
- To see the page in the context of Lightning Experience, return to the main Lightning Experience browser window, then open Chromes' “Developer Tools” and go to the JavaScript console. Type the JavaScript below.
- It fires the Lightning Experience
navigateToURLevent - equivalent of entering in the classic/apex/PageNameURL
- It fires the Lightning Experience
<apex:page>
    <h1>Hello World</h1>
</apex:page>
$A.get("e.force:navigateToURL").setParams(
    {"url": "/apex/HelloWorld"}).fire();
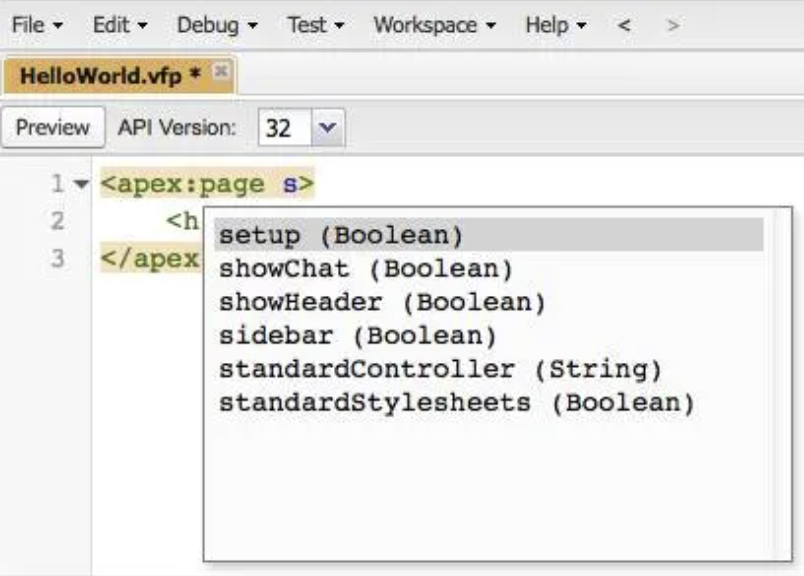
- Add Attributes Using Auto-Suggest
- Typing a single character shows a list of possible completions for what you want to add in Visualforce
- Standard Component Reference
- Add and Compose Components to Form a Page Structure
<apex:page>
    <h1>Hello World</h1>
    <apex:pageBlock title="A Block Title">
        <apex:pageBlockSection title="A Section Title">
            I'm three components deep!
        </apex:pageBlockSection>
        <apex:pageBlockSection title="A New Section">
            This is another section.
        </apex:pageBlockSection>
    </apex:pageBlock>
</apex:page>
- Developer Console is the most powerful, feature-complete tool for Lightning development from within the Salesforce org
- Two other ways to create/edit Visualforce pages in Salesforce:
- Development mode “quick fix” and footer
- Setup editor, available from Setup > Quick Find > “Visual” > Visualforce Pages
- Two other ways to create/edit Visualforce pages in Salesforce:
- Example that displays an image in a Visualforce page:
<apex:page >
    <apex:image id="theImage" value="https://developer.salesforce.com/files/salesforce-developer-network-logo.png"/>
</apex:page>
Use Simple Variables and Formulas
Explain what a Visualforce expression is and describe where it’s used. List three or more global variables available for use in Visualforce expressions. Add a Visualforce expression to a Visualforce page. Use a function in a Visualforce expression.- Introduction to Global Variables and Visualforce Expressions
- Visualforce can display data retrieved from database, or web services, or which changes depending on who is logged in, etc
- Dynamic data is accessed in markup through global variables, calculations, and properties made available by the page’s controller
- These are generally described as Visualforce expressions
- Expression: any set of literal values, variables, sub-expressions, or operators that can be resolved to a single value
{! expression }- Anything inside
{! }is evaluated - can result in a primitive (integer, string, etc), a boolean, an sObject, a controller method like an action, etc
- Global Variables
- Visualforce provides info about the logged-in user in a global variable called
$User, and you can access fields of$Userglobal variable using an expression like{! $GlobalName.fieldName }- See code block below
- Visualforce expressions are case-insensitive
- Visualforce provides info about the logged-in user in a global variable called
- Formula Expressions
- Formula expressions let you manipulate values in the expression language
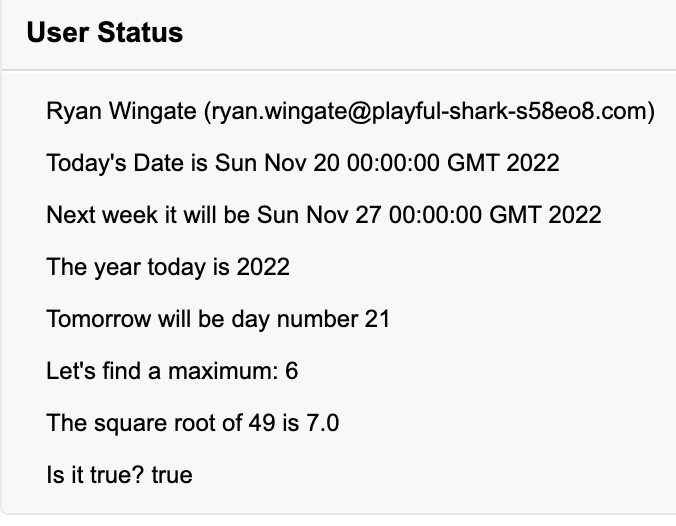
<apex:page>
    <apex:pageBlock title="User Status">
        <apex:pageBlockSection columns="1">
            {! $User.FirstName & ' ' & $User.LastName }
           ({! $User.Username })
            <p> Today's Date is {! TODAY() } </p>
            <p> Next week it will be {! TODAY() + 7 } </p>
            <p>The year today is {! YEAR(TODAY()) }</p>
            <p>Tomorrow will be day number  {! DAY(TODAY() + 1) }</p>
            <p>Let's find a maximum: {! MAX(1,2,3,4,5,6,5,4,3,2,1) } </p>
            <p>The square root of 49 is {! SQRT(49) }</p>
            <p>Is it true?  {! CONTAINS('salesforce.com', 'force.com') }</p>
        </apex:pageBlockSection>
    </apex:pageBlock>
</apex:page>
- Conditional Expressions
- You can use a conditional expression to display different information based on the value of the expression
<p>{! IF( CONTAINS('salesforce.com','force.com'),
     'Yep', 'Nope') }</p>
<p>{! IF( DAY(TODAY()) < 15,
     'Before the 15th', 'The 15th or after') }</p>
({! IF($User.isActive, $User.Username, 'inactive') })
- There are nearly two dozen global variables and functions that you can use in Visualforce expressions
- Ex:
$Organization,$Setup,$ObjectionType,$Action - Global Variable Reference
- Ex:
Use Standard Controllers
Explain what a Visualforce standard controller is and describe its key attributes. Add a standard controller to a Visualforce page. Display data from a record retrieved by a page’s standard controller. Write an expression that uses dot notation to access fields on a related record.- Introduction to the Visualforce Standard Controller
- Visualforce uses the traditional model-view-controller (MVC) paradigm
- Uses built-in controllers to handle standard actions and data access to the Lightning Platform database
- Built-in controllers are called “standard controllers” or “the standard controller”
- MVC design pattern makes it easy to separate the view and its styling from the underlying database and logic
- Visualforce page interacts with the controller, controller provides functionality to the page
- Ex: controller contains logic to be executed when a button is clicked
- Controller also interacts with the model (database), making available that the view wants to display, or pushing changes back to the database
- Visualforce page interacts with the controller, controller provides functionality to the page
- Most standard and all custom objects have standard controllers, so you don’t need to write them from scratch, though you can
- You can extend the standard controller
- Visualforce uses the traditional model-view-controller (MVC) paradigm
- Find a Record ID and Add It to the Request URL
- Provide the record ID for a record to the standard controller by adding it as a parameter in the request URL
- When your Visualforce page interact with other pages, they can automatically pass in the record’s identifier
- During development, pages are stand-alone, so you need to provide the record ID manually - easiest way is by adding a
GETparameter to the request URL - Resulting URL:
https://playful-shark-s58eo8-dev-ed--c.trailblaze.vf.force.com/apex/AccountSummary?core.apexpages.request.devconsole=1&id=0014S000009vFENQA2 - To preview in the context of Lightning Experience, run the following in your browser’s JavaScript console:
- Provide the record ID for a record to the standard controller by adding it as a parameter in the request URL
$A.get("e.force:navigateToURL").setParams(
    {"url": "/apex/AccountSummary?&id=0014S000009vFENQA2"}).fire();
- Display Data from a Single Record
- Add the following attribute inside the
<apex:page>tag - page will look the same, but the standard controller for accounts is now active- When page is loaded,
<apex:page>component is activated and activates a standard controller for the account object - Standard controller sees an ID parameter in URL - searches for and retrieves matching account record
- Standard controller takes the record and puts it in a variable that makes it available to the page
- The four Visualforce expressions below all reference the Account variable
- When page is loaded,
- Add the following attribute inside the
<apex:page standardController="Contact">
    <apex:pageBlock title="Contact Summary">
        <apex:pageBlockSection>
            First Name: {! Contact.FirstName } <br/>
            Last Name: {! Contact.LastName } <br/>
            Owner Email: {! Contact.Owner.Email } <br/>
        </apex:pageBlockSection>
    </apex:pageBlock>
</apex:page>
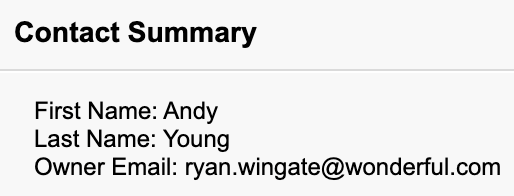
- Display Fields from Related Records
- Use dot notation to display data from related records
- Ex:
Account owner: {! Account.Owner.Name}accesses theNamefield on theUserrelated record stored inOwnerlookup field onAccount - Another example, from
Contact
<apex:page standardController="Contact">
    <apex:pageBlock title="Contact Summary">
        <apex:pageBlockSection>
            Name: {! Contact.Name } <br/>
            Phone: {! Contact.Phone } <br/>
            Owner Email: {! Contact.Owner.Email } <br/>
        </apex:pageBlockSection>
    </apex:pageBlock>
</apex:page>
Display Records, Fields, and Tables
Explain the difference between coarse-grained and fine-grained components, and why you might want to use one or the other. Explain what an iteration component is and what it’s used for. Use relevant coarse-grained components to display record details and related lists. Use relevant fine-grained components to replace and customize coarse-grained components.- Introduction to Output Components
- Visualforce includes nearly 150 built-in components you can use in pages
- Components are rendered into HTML, CSS, and JavaScript when a page is requested
- Coarse-grained components provide significant amount of functionality in a single component, and add a lot of info and user interface to the page it’s used on
- Fine-grained components provide more focused functionality and enable you to design the page to look and behave the way you want
- Create a Visualforce Page with a Standard Controller
- Use URLs similar to the following to preview:
https://playful-shark-s58eo8-dev-ed--c.trailblaze.vf.force.com/apex/AccountDetail?core.apexpages.request.devconsole=1&id=0014S000009vFEPQA2
- Use URLs similar to the following to preview:
<apex:page standardController="Account">
    {! Account.Name }
</apex:page>
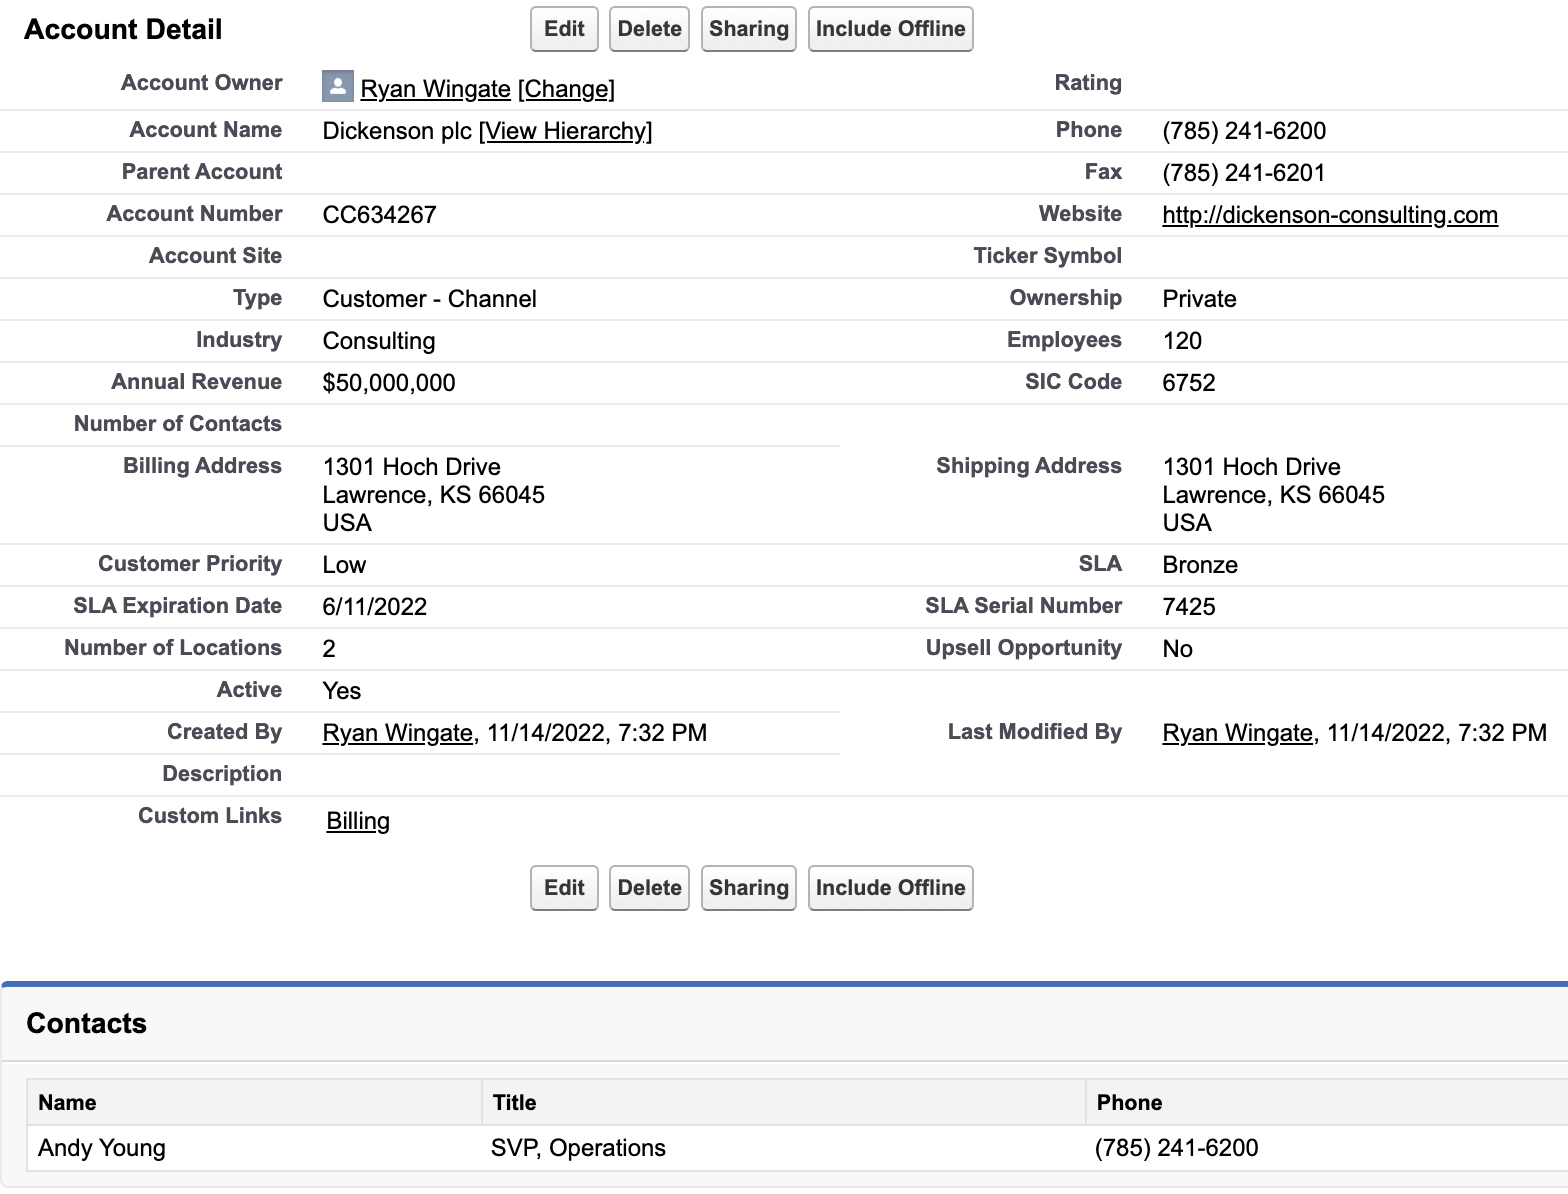
- Display Record Details
- Use
<apex:detail>to quickly add record details to a page that uses a standard controller- Example of a coarse-grained component that offers a lot of functionality, displaying many fields, labels, and other UI elements
- Notice that the styling that the component adds uses Salesforce Classic styling
- Use
<apex:page standardController="Account">
    <apex:detail />
</apex:page>

- Display Related Lists
<apex:relatedList>displays lists of records related to the current record<apex:detail>displays the details of a particular record<apex:detail relatedList="false"/>: Revises the markup to omit related lists- Adding
<apex:relatedList list="Contacts"/>and<apex:relatedList list="Opportunities" pageSize="5"/>will make the page display two related lists, for contacts and opportunities- Note attributes of the related lists can be changed independently
<apex:relatedList>component is also “course-grained,” but lower level than<apex:detail>
<apex:page standardController="Account">
    <apex:detail relatedList="false"/>
    <apex:relatedList list="Contacts"/>
	<apex:relatedList list="Opportunities" pageSize="5"/>
</apex:page>

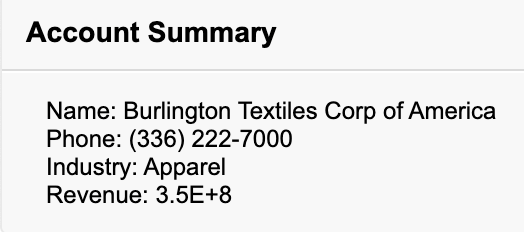
- Display Individual Fields
- Use
<apex:outputField>to display individual fields from a record, which gives even more fine-grained control than<apex:detail/> - Wrapping them within
<apex:pageBlock>and<apex:pageBlockSection>components provides the platform look and feel
- Use
<apex:page standardController="Account">
    <apex:pageBlock title="Account Details">
        <apex:pageBlockSection>
            <apex:outputField value="{! Account.Name }"/>
            <apex:outputField value="{! Account.Phone }"/>
            <apex:outputField value="{! Account.Industry }"/>
            <apex:outputField value="{! Account.AnnualRevenue }"/>
        </apex:pageBlockSection>
    </apex:pageBlock>
</apex:page>

- Display A Table
- Use
<apex:pageBlockTable>to add a table of data to a page<apex:relatedList>actually uses tables under the hood- It grabs aa list of similar data elements, like a list of contacts
- It then sets up a table with columns for each field, headers atop each column, etc
- For each item in the list, it adds a row to the table, and fills in each column with the appropriate field from that record
- Iteration components in Visualforce let you do the same thing. Ex:
- Use
<apex:page standardController="Account">
    <apex:detail relatedList="false"/>
	<apex:pageBlock title="Contacts">
        <apex:pageBlockTable value="{!Account.contacts}" var="contact">
            <apex:column value="{!contact.Name}"/>
            <apex:column value="{!contact.Title}"/>
            <apex:column value="{!contact.Phone}"/>
       </apex:pageBlockTable>
    </apex:pageBlock>
</apex:page>
<apex:page standardController="Opportunity">
    <apex:pageBlock title="Opportunity Details">
        <apex:pageBlockSection>
            <apex:outputField value="{! Opportunity.Name }"/>
            <apex:outputField value="{! Opportunity.Amount }"/>
            <apex:outputField value="{! Opportunity.CloseDate }"/>
            <apex:outputField value="{! Opportunity.Account.Name }"/>
        </apex:pageBlockSection>
    </apex:pageBlock>
</apex:page>

Input Data Using Forms
Explain the essential requirements for a Visualforce form. Distinguish Visualforce form elements using the platform visual style from those that don’t. List four or more standard input form tags. Create a Visualforce form to edit and save a record.- Introduction to Visualforce Forms
- Creating and editing data are fundamental aspects of any app
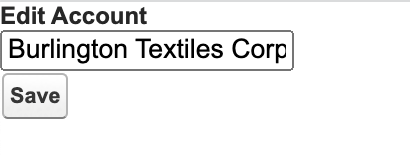
- Create a Basic Form
- Use
<apex:form>and<apex:inputField>to create a page to edit data - Combine
<apex:commandButton>with the save action built into the standard controller to create a new record, or save changes to an existing one - Code below gives you a fully-functional form for updating an account’s name:
- Uses the standard controller for accounts, defined in
<apex:page> <apex:form>packages everything inside it tinto something that can be sent back to the server as part of a page action<apex:inputField>creates an onscreen form field for the record data that’s associated with it<apex:commandButton>adds a button to the page’s user interface that fires an action when it’s clicked
- Uses the standard controller for accounts, defined in
- Use
<apex:page standardController="Account">
    <h1>Edit Account</h1>
    <apex:form>
        <apex:inputField value="{! Account.Name }"/>
        <apex:commandButton action="{! save }" value="Save" />
    </apex:form>
</apex:page>
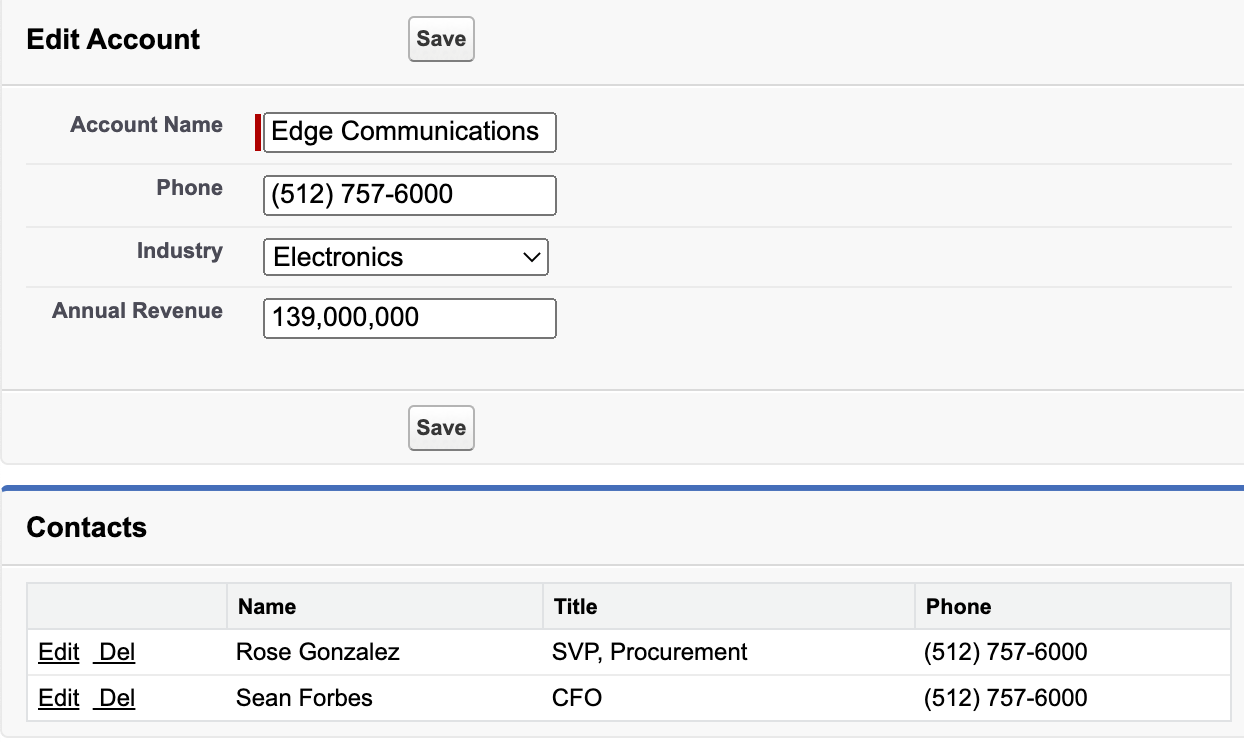
- Add Field Labels and Platform Styling
- Placing form elements within
<apex:pageBlock>and<apex:pageBlockSection>tags to organize and group them and adopt the platform visual style <apex:inputField>can be used to capture user input for any standard or custom object field and respects any metadata that is set on the field definition, such as whether the field is required or unique, or whether the current user has permission to view or edit it
- Placing form elements within
<apex:page standardController="Account">
    <apex:form>
        <apex:pageBlock title="Edit Account">
            <apex:pageMessages/>
            <apex:pageBlockSection columns="1">
                <apex:inputField value="{! Account.Name }"/>
                <apex:inputField value="{! Account.Phone }"/>
                <apex:inputField value="{! Account.Industry }"/>
                <apex:inputField value="{! Account.AnnualRevenue }"/>
            </apex:pageBlockSection>
            <apex:pageBlockButtons>
                <apex:commandButton action="{! save }" value="Save" />
            </apex:pageBlockButtons>
        </apex:pageBlock>
    </apex:form>
</apex:page>

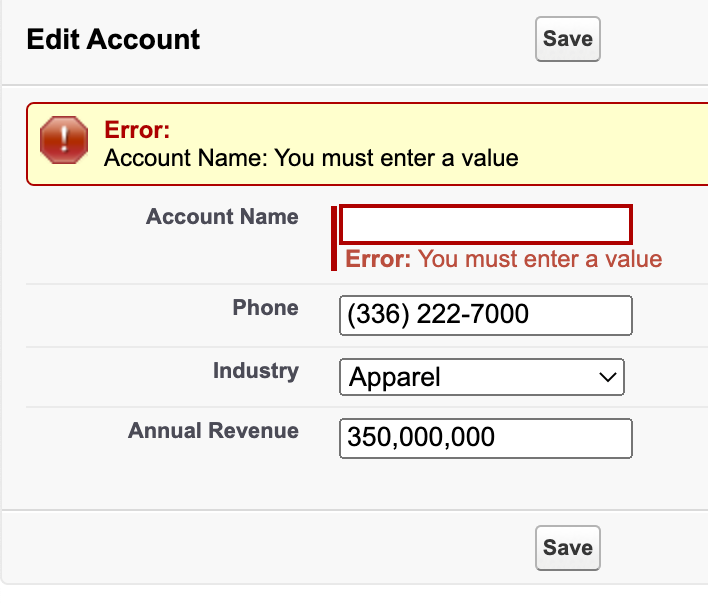
- Display Form Errors and Messages
- Use
<apex:pageMessages>to display any form handling errors or messages - Each
<apex:inputField>displays errors for its own field, but for a longer form it can be helpful to list all the page’s errors in one place at the top of the page
- Use
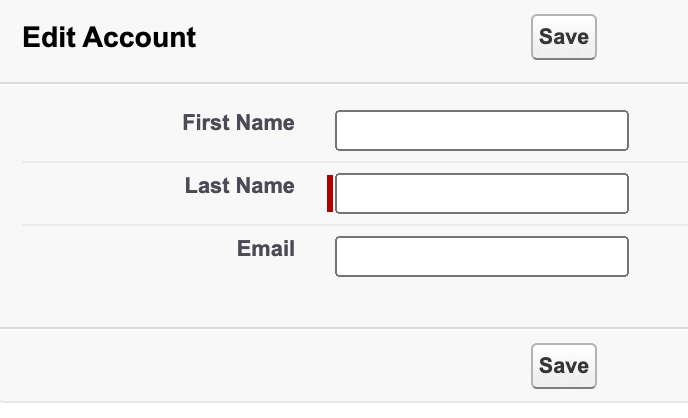
- Edit Related Records
- When using the standard controller, you can’t save changes to multiple object types in one request, but you can make it easier to navigate to related records by offering links
- Adding the following markup below the
</apex:pageBlock>tag gives the following
<apex:page standardController="Contact">
    <apex:form>
        <apex:pageBlock title="Edit Account">
            <apex:pageBlockSection columns="1">
                <apex:inputField value="{! Contact.FirstName }"/>
                <apex:inputField value="{! Contact.LastName }"/>
                <apex:inputField value="{! Contact.Email }"/>
            </apex:pageBlockSection>
            <apex:pageBlockButtons>
                <apex:commandButton action="{! save }" value="Save" />
            </apex:pageBlockButtons>
        </apex:pageBlock>
    </apex:form>
</apex:page>
Use Standard List Controllers
Explain what a Visualforce standard list controller is and how it's different from a standard (record) controller. List three actions provided by the standard list controller that are different from a standard controller. Display a list of records using a standard list controller on a Visualforce page. Define pagination, and be able to add it to a Visualforce page.- Introduction to the Standard List Controller
- Displaying a list of records is a fundamental behavior of almost all web apps
- Standard list controller provides many powerful, automatic behaviors like querying for records of a specific object and making them available in a collection variable, as well as filtering and paginating through the results
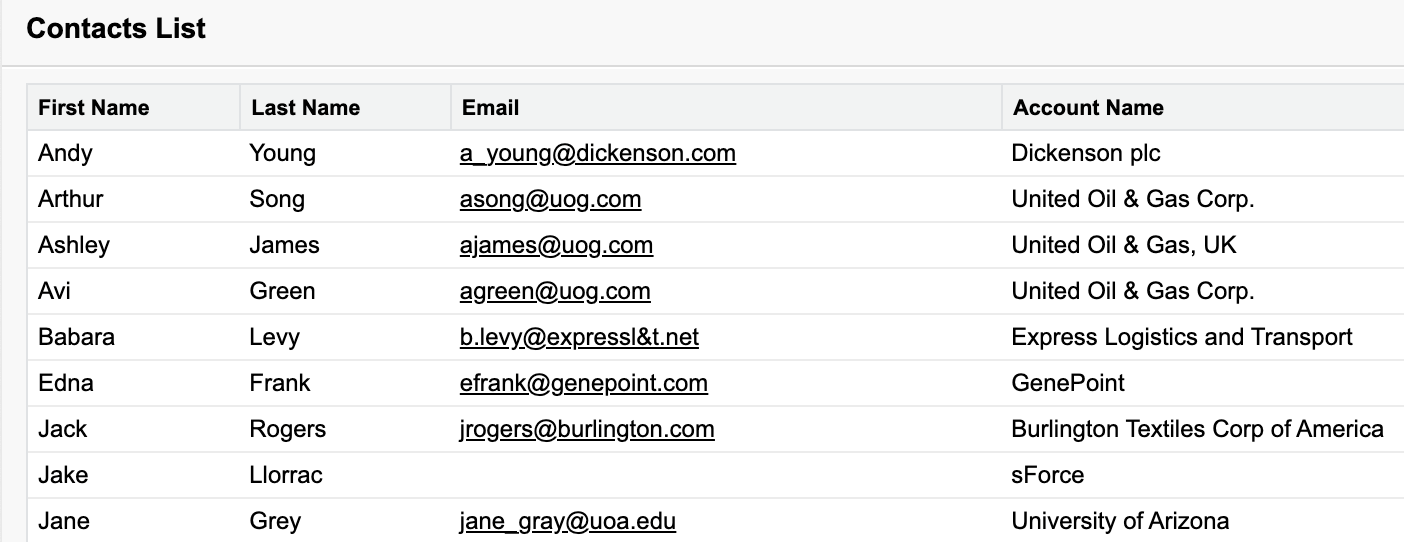
- Display a List of Records
- Use the standard list controller and an iteration component, like
<apex:pageBlockTable>to display a list of records - The standard controller makes it easy to get a single record loaded into a variable. The standard list controller is similar, except instead of a single record, it loads a list, or collection, of records into the variable
recordSetVarsets the name of the variable to be created with the collection of records, here:{! contacts}<apex:pageBlockTable>is an iteration component that generates a table of data, complete with styling- For each record,
<apex:pageBlockTable>assigns that record to the variable named in thevarattribute. In this case:ct
- Use the standard list controller and an iteration component, like
<apex:page standardController="Contact" recordSetVar="contacts">
    <apex:pageBlock title="Contacts List">
        <!-- Contacts List -->
        <apex:pageBlockTable value="{! contacts }" var="ct">
            <apex:column value="{! ct.FirstName }"/>
            <apex:column value="{! ct.LastName }"/>
            <apex:column value="{! ct.Email }"/>
            <apex:column value="{! ct.Account.Name }"/>
        </apex:pageBlockTable>
    </apex:pageBlock>
</apex:page>
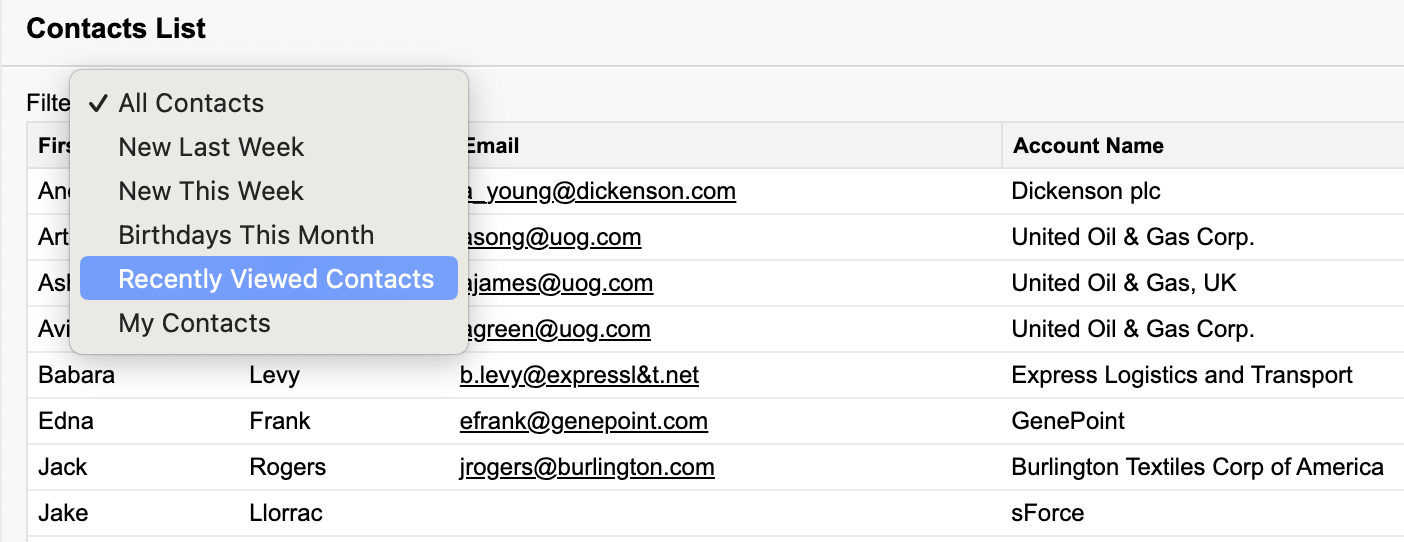
- Add List View Filtering to the List
- Use
{! listViewOptions}to get a list of list view filters available for an object
- Use
<apex:page standardController="Contact" recordSetVar="contacts">
    <apex:form>
        <apex:pageBlock title="Contacts List" id="contacts_list">
            Filter:
            <apex:selectList value="{! filterId }" size="1">
                <apex:selectOptions value="{! listViewOptions }"/>
                <apex:actionSupport event="onchange" reRender="contacts_list"/>
            </apex:selectList>
            <!-- Contacts List -->
            <apex:pageBlockTable value="{! contacts }" var="ct">
                <apex:column value="{! ct.FirstName }"/>
                <apex:column value="{! ct.LastName }"/>
                <apex:column value="{! ct.Email }"/>
                <apex:column value="{! ct.Account.Name }"/>
            </apex:pageBlockTable>
        </apex:pageBlock>
    </apex:form>
</apex:page>
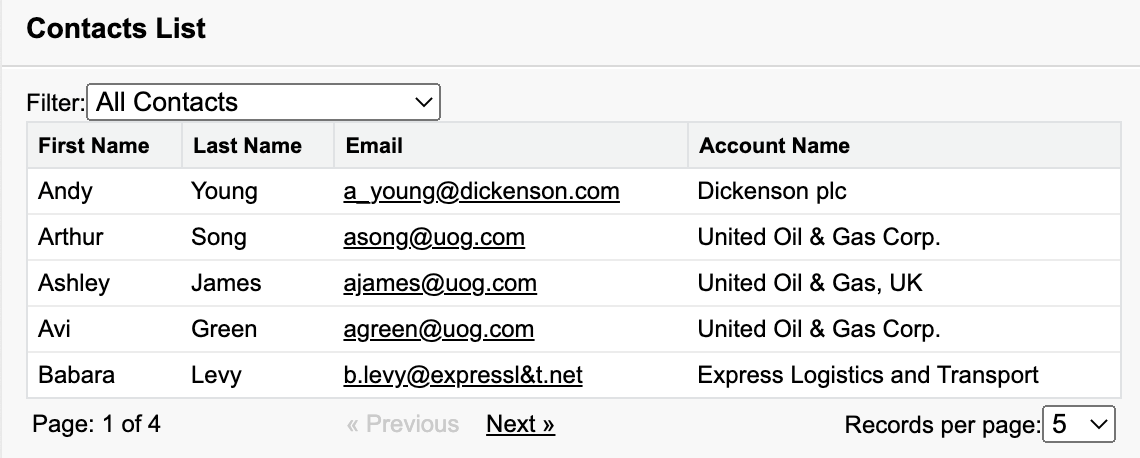
- Add Pagination to the List
- Pagination lets you move through long lists of records more easily
- The following code should be added after the
</apex:pageBlockTable>to add pagination
<!-- Pagination -->
<table style="width: 100%"><tr>
<td>
Page: <apex:outputText
value=" {!PageNumber} of {! CEILING(ResultSize / PageSize) }"/>
</td>
<td align="center">
<!-- Previous page -->
<!-- active -->
<apex:commandLink action="{! Previous }" value="« Previous"
rendered="{! HasPrevious }"/>
<!-- inactive (no earlier pages) -->
<apex:outputText style="color: #ccc;" value="« Previous"
rendered="{! NOT(HasPrevious) }"/>
<!-- Next page -->
<!-- active -->
<apex:commandLink action="{! Next }" value="Next »"
rendered="{! HasNext }"/>
<!-- inactive (no more pages) -->
<apex:outputText style="color: #ccc;" value="Next »"
rendered="{! NOT(HasNext) }"/>
</td>
<td align="right">
Records per page:
<apex:selectList value="{! PageSize }" size="1">
<apex:selectOption itemValue="5" itemLabel="5"/>
<apex:selectOption itemValue="20" itemLabel="20"/>
<apex:actionSupport event="onchange" reRender="contacts_list"/>
</apex:selectList>
</td>
</tr>
</table>
<apex:page standardController="Account" recordSetVar="Accounts" >
    <apex:pageblock>
        <apex:repeat value="{!Accounts}" var="a" rendered="true" id="account_list">
            <li>
                <apex:outputLink value="/{!a.ID}" >
                    <apex:outputText value="{!a.Name}"/>
                </apex:outputLink>
            </li>
        </apex:repeat>
    </apex:pageblock>
</apex:page>

Use Static Resources
Explain what static resources are and why to use them. Explain the difference between individual and zipped static resources. Create and upload a static resource. Add static resources to a Visualforce page.- Introduction to Static Resources
- Static resources allow you to upload content that you can reference in a Visualforce page
- Can be archives (.zip, .jar), images, stylesheets, JavaScript, and other files
- Static resources are manage and distributed by Lightning Platform, which acts as content distribution network for the files
- Referenced using the
$Resourceglobal variable, which is used directly by Visualforce, or used as a parameter to functions such asURLFOR()
- Static resources allow you to upload content that you can reference in a Visualforce page
- Create and Upload a Simple Static Resource
- For example, can upload the jQuery JavaScript library from http://jquery.com/download/
- Upload to static resources via: Setup > Quick Find > “Static” > Static Resources
- Add a Static Resource to a Visualforce Page
- You can use the
$Resourceglobal variable and dot notation to reference stand-alone static resources- Use dot notation to combine it with the resource in an
<apex:includeScript>for JavaScript,<apex:stylesheet>for CSS, or<apex:image>for graphics
- Use dot notation to combine it with the resource in an
- You can use the
<apex:page>
    <!-- Add the static resource to page's <head> -->
    <apex:includeScript value="{! $Resource.jQuery }"/>
    <!-- A short bit of jQuery to test it's there -->
    <script type="text/javascript">
        jQuery.noConflict();
        jQuery(document).ready(function() {
            jQuery("#message").html("Hello from jQuery!");
        });
    </script>
    <!-- Where the jQuery message will appear -->
    <h1 id="message"></h1>
</apex:page>

- Create and Upload a Zipped Static Resource
- Create zipped static resources to group together related files that are usually updated together
- Example: download the current version of jQuery Mobile JavaScript library in ZIP format, unzip, remove the “Demos” subfolder, then zip again and rename as jquery.zip
- Upload to static resources via: Setup > Quick Find > “Static” > Static Resources
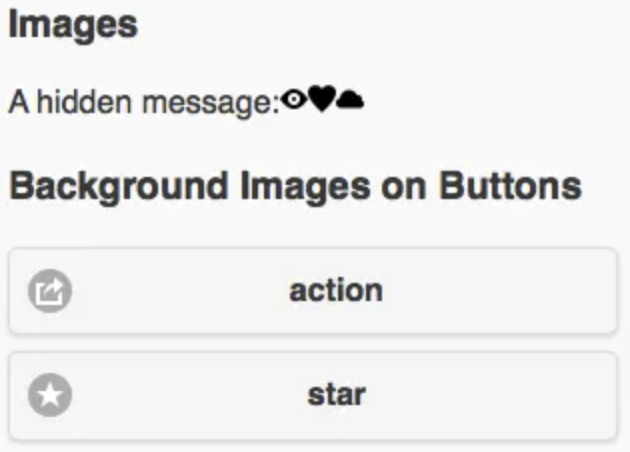
- Add Zipped Static Resources to a Visualforce Page
<apex:page showHeader="false" sidebar="false" standardStylesheets="false">
    <!-- Add static resources to page's <head> -->
    <apex:stylesheet value="{!
        URLFOR($Resource.jQueryMobile,'jquery/jquery.mobile-1.4.5.css')}"/>
    <apex:includeScript value="{! $Resource.jQueryMobile }"/>
    <apex:includeScript value="{!
        URLFOR($Resource.jQueryMobile,'jquery/jquery.mobile-1.4.5.js')}"/>
    <div style="margin-left: auto; margin-right: auto; width: 50%">
        <!-- Display images directly referenced in a static resource -->
        <h3>Images</h3>
        <p>A hidden message:
            <apex:image alt="eye" title="eye"
                url="{!URLFOR($Resource.jQueryMobile, 'jquery/images/icons-png/eye-black.png')}"/>
            <apex:image alt="heart" title="heart"
                url="{!URLFOR($Resource.jQueryMobile, 'jquery/images/icons-png/heart-black.png')}"/>
            <apex:image alt="cloud" title="cloud"
                url="{!URLFOR($Resource.jQueryMobile, 'jquery/images/icons-png/cloud-black.png')}"/>
        </p>
    <!-- Display images referenced by CSS styles, all from a static resource. -->
    <h3>Background Images on Buttons</h3>
    <button class="ui-btn ui-shadow ui-corner-all
        ui-btn-icon-left ui-icon-action">action</button>
    <button class="ui-btn ui-shadow ui-corner-all
        ui-btn-icon-left ui-icon-star">star</button>
    </div>
</apex:page>
Create & Use Custom Controllers
Explain what a custom controller is and describe its key attributes. Create a custom controller class. Use a custom controller on a Visualforce page.- Introduction to Custom Controllers
- Custom controllers contain custom logic and data manipulation that can be used by a Visualforce page
- Ex: can retrieve a list of items to be displayed, make a callout to an external web service, validate and insert data, etc
- Controllers typically retrieve data to be displayed in a Visualforce page, and contain code that executes in response to page actions, such as a button being clicked
- Standard controllers do not always accomplish everything needed in custom applications - that is where Visualforce lets developers take over
- Custom controllers let you control your app’s logic from start to finish
- Custom controllers contain custom logic and data manipulation that can be used by a Visualforce page
- Create a Visualforce Page that Uses a Custom Controller
- Create Visualforce page called
ContactsListWithControllercontaining the markup shown below
- Create Visualforce page called
<apex:page controller="ContactsListWithController">
    <apex:form>
        <apex:pageBlock title="Contacts List" id="contacts_list">
            <!-- Contacts List goes here -->
        </apex:pageBlock>
    </apex:form>
</apex:page>
- Create a Custom Controller Apex Class
- Custom controllers are just an Apex class you write yourself
- No need to inherit from another class or interface, or implement anything
- Custom controllers are just an Apex class you write yourself
public class ContactsListWithController {
    // Controller code goes here
}
- Add a Method to Retrieve Records
- Create a getter method that runs a SOQL query that returns records you want to display on your page
private String sortOrder = 'LastName';
public List<Contact> getContacts() {
    List<Contact> results = Database.query(
        'SELECT Id, FirstName, LastName, Title, Email ' +
        'FROM Contact ' +
        'ORDER BY ' + sortOrder + ' ASC ' +
        'LIMIT 10'
    );
    return results;
}
- Add a New Action Method
<!-- Contacts List -->
<apex:pageBlockTable value="{! contacts }" var="ct">
    <apex:column value="{! ct.FirstName }">
        <apex:facet name="header">
            <apex:commandLink action="{! sortByFirstName }"
                reRender="contacts_list">First Name
            </apex:commandLink>
        </apex:facet>
    </apex:column>
    <apex:column value="{! ct.LastName }">
        <apex:facet name="header">
            <apex:commandLink action="{! sortByLastName }"
                reRender="contacts_list">Last Name
            </apex:commandLink>
        </apex:facet>
    </apex:column>
    <apex:column value="{! ct.Title }"/>
    <apex:column value="{! ct.Email }"/>
</apex:pageBlockTable>
Final Example
Custom Apex controller: NewCaseListController.apxc
public class NewCaseListController {
    public List<Case> getNewCases() {

        List<Case> results = [SELECT CaseNumber FROM Case WHERE status='New'];
            return results;
    }
}
Visualforce page: NewCaseList.vfp
<apex:page controller="NewCaseListController">
    <apex:pageBlock title="new Case List" id="cases_list">
        <li>
            <apex:repeat var="case" value="{!newCases}" rendered="true" id="rCases">
                <p><apex:outputLink value="/{!case.ID}">{!case.CaseNumber}</apex:outputLink></p>
            </apex:repeat>
		</li>
    </apex:pageBlock>
</apex:page>