Quick Start: Unlocked Packages
These are technical notes I compiled while studying using Trailhead, Salesforce's free self-learning portal.
Get Ready to Create Your First Unlocked Package
Salesforce DX provides a new set of tools and processes to streamline the development lifecycle for Salesforce developers. The tools focus on team development and automation, and the notion of modular, package-based development, which is a game change for customers and Salesforce Independent Software Vendors.
This page has notes that are an introduction to Unlocked Packages as a mechanism for managing change to the internal business apps you build.
What Is an Unlocked Package?
- A software package is a container you fill with metadata
- Contains a set of related features, customizations, and schema
- Salesforce offers several types of packages, each with unique characteristics
- This page focuses on a special package type, an Unlocked Package, which is well suited for internal business apps
- Unlocked packages help you add, edit, and remove metadata in your org in a trackable way
- You can apply your source and metadata to multiple orgs, and upgrade Salesforce apps easier and faster
- Packages encapsulate all the metadata changes and updates you plan to make
- Unlocked packages grant a lot of flexibility:
- Admins can make changes directly in production in response to emergency change requests because metadata from unlocked packages can be modified in production orgs
- This flexibility requires responsibility - make sure the governance structures are in place to prevent cases where package updates overwrite changes that admins make directly in production
Configure Your Environment
- The steps that follow require:
- A new Trailhead Playground
- Username credentials for the Trailhead org
- Enable Dev Hub in the Trailhead org, Enable Unlocked Packages and Second-Generation Managed Packages in the Trailhead org
- Setup > Quick Find > Dev Hub
- A GitHub account
- Salesforce CLI on your computer
- After you build your unlocked package, you test it in a scratch org, and eventually in more permanent orgs, like sandboxes
- This quick start involves installing the package in your Trailhead org
- Once steps 1-5 above are complete, log in to the Trailhead org using Salesforce CLI
- Give the Trailhead org an alias, as follows:
sfdx auth:web:login --setalias MyTP - The, run
sfdx force:org:listto confirm the credentials were stored locally - Now, whenever you run a command from the CLI and use
--setalias MyTP, it performs the operation against your Trailhead org
- Give the Trailhead org an alias, as follows:
Download the Sample App from GitHub
- Clone the repository here
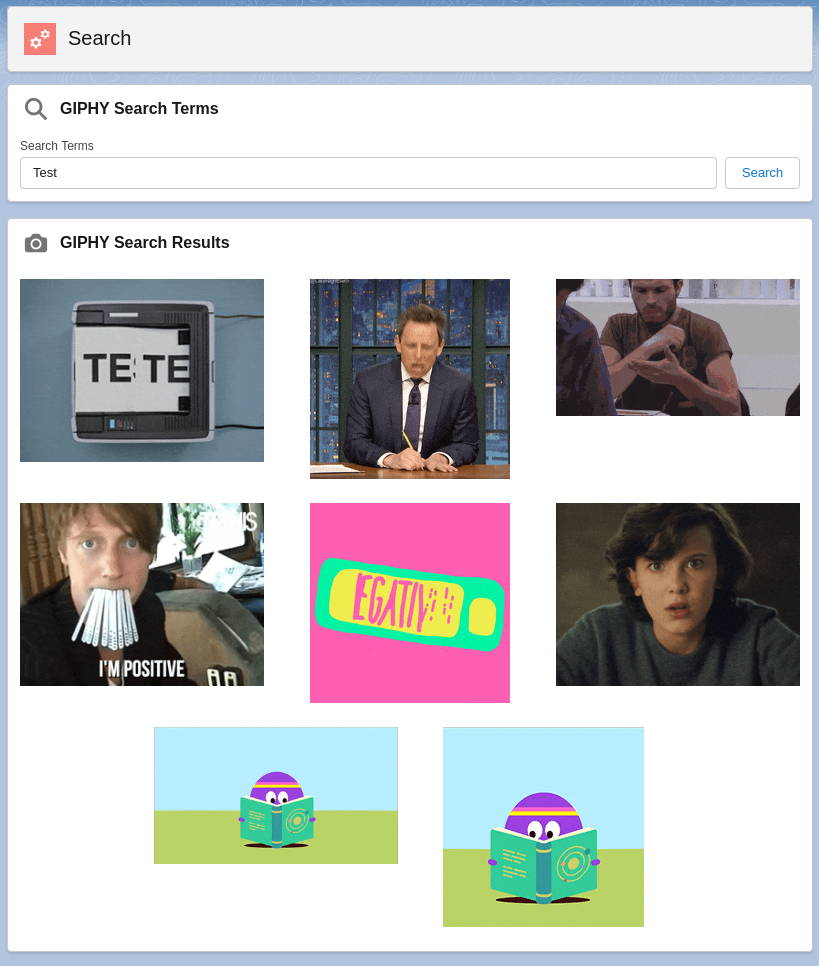
Create a GIPHY App
- Follow the instructions on the Trailhead module, linked here, to create an account and an app
Create, Test, and Deploy Your Unlocked Package
Build and Test the Project in a Scratch Org
- Navigate into the
GIFterdirectory - Log into the Deb Hub org using
sfdx auth:web:login --setdefaultdevhubusername --setalias DevHub - Create a scratch org using
sfdx force:org:create --setdefaultusername --definitionfile config/project-scratch-def.json
This line creates a ready-to-use scratch org and set it as the default for your project workspace
The response will be similar to the following:
Successfully created scratch org: 00D1100000BvDK3EAN, username: [email protected]
- Next, push all your source from the
force-appfolder in to the new scratch org usingsfdx force:source:push
The response will be similar to the following.
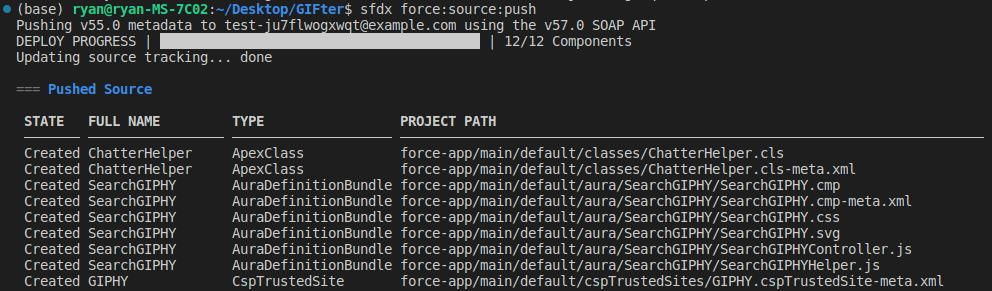
=== Pushed Source
STATE  FULL NAME                             TYPE                  PROJECT PATH
─────  ────────────────────────────────────  ────────────────────  ─────────────────────────────────────────────────────────────────────────
Add    GIFter                                CustomApplication     force-app/main/default/applications/GIFter.app-meta.xml
Add    SearchGIPHY/SearchGIPHY.auradoc       AuraDefinitionBundle  force-app/main/default/aura/SearchGIPHY/SearchGIPHY.auradoc
Add    SearchGIPHY/SearchGIPHY.cmp           AuraDefinitionBundle  force-app/main/default/aura/SearchGIPHY/SearchGIPHY.cmp
Add    SearchGIPHY/SearchGIPHY.cmp           AuraDefinitionBundle  force-app/main/default/aura/SearchGIPHY/SearchGIPHY.cmp-meta.xml
Add    SearchGIPHY/SearchGIPHY.css           AuraDefinitionBundle  force-app/main/default/aura/SearchGIPHY/SearchGIPHY.css
Add    SearchGIPHY/SearchGIPHY.design        AuraDefinitionBundle  force-app/main/default/aura/SearchGIPHY/SearchGIPHY.design
Add    SearchGIPHY/SearchGIPHY.svg           AuraDefinitionBundle  force-app/main/default/aura/SearchGIPHY/SearchGIPHY.svg
Add    SearchGIPHY/SearchGIPHYController.js  AuraDefinitionBundle  force-app/main/default/aura/SearchGIPHY/SearchGIPHYController.js
Add    SearchGIPHY/SearchGIPHYHelper.js      AuraDefinitionBundle  force-app/main/default/aura/SearchGIPHY/SearchGIPHYHelper.js
Add    SearchGIPHY/SearchGIPHYRenderer.js    AuraDefinitionBundle  force-app/main/default/aura/SearchGIPHY/SearchGIPHYRenderer.js
Add    ChatterHelper                         ApexClass             force-app/main/default/classes/ChatterHelper.cls
Add    ChatterHelper                         ApexClass             force-app/main/default/classes/ChatterHelper.cls-meta.xml
Add    GIPHY                                 CspTrustedSite        force-app/main/default/cspTrustedSites/GIPHY.cspTrustedSite-meta.xml
Add    GIFter                                FlexiPage             force-app/main/default/flexipages/GIFter.flexipage-meta.xml
Add    GIFter_UtilityBar                     FlexiPage             force-app/main/default/flexipages/GIFter_UtilityBar.flexipage-meta.xml
Add    GIFter                                PermissionSet         force-app/main/default/permissionsets/GIFter.permissionset-meta.xml
Add    GiphyMedia0                           RemoteSiteSetting     force-app/main/default/remoteSiteSettings/GiphyMedia0.remoteSite-meta.xml
Add    GiphyMedia1                           RemoteSiteSetting     force-app/main/default/remoteSiteSettings/GiphyMedia1.remoteSite-meta.xml
Add    GIPHY                                 StaticResource        force-app/main/default/staticresources/GIPHY.resource
Add    GIPHY                                 StaticResource        force-app/main/default/staticresources/GIPHY.resource-meta.xml
Add    jquery360                             StaticResource        force-app/main/default/staticresources/jquery360.js
Add    jquery360                             StaticResource        force-app/main/default/staticresources/jquery360.resource-meta.xml
Add    GIFter                                CustomTab             force-app/main/default/tabs/GIFter.tab-meta.xml
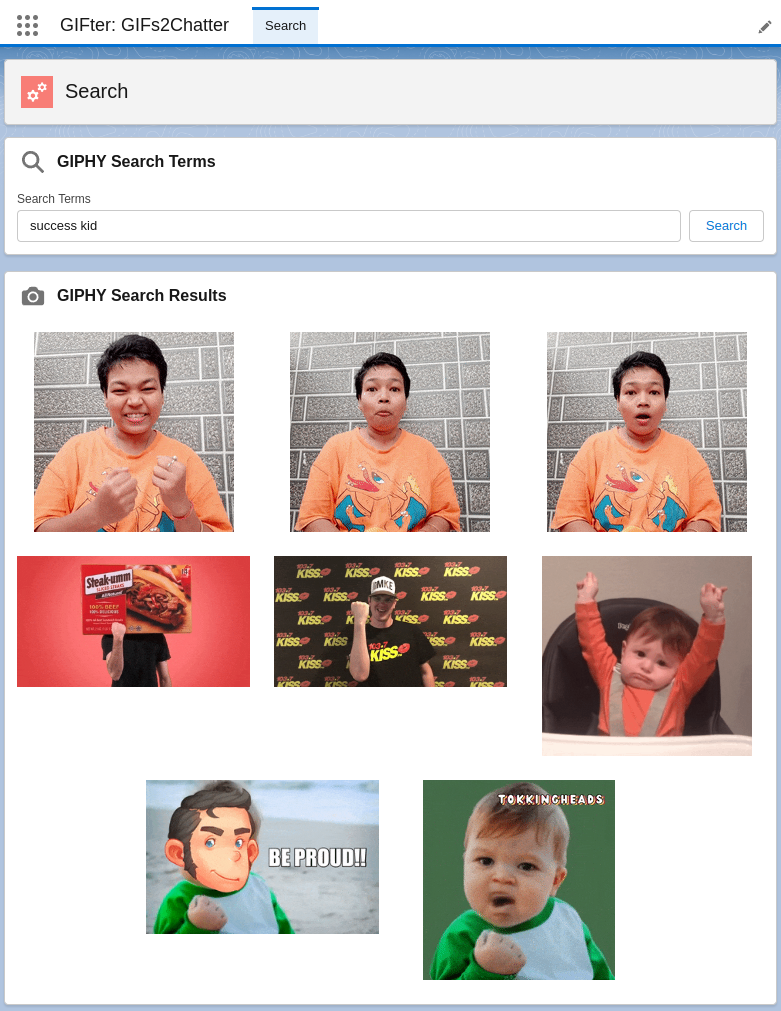
- There’s a permission set named
GIFterthat you use to govern access to the GIFter app. Assign to the default user in the scratch org usingsfdx force:user:permset:assign --permsetname GIFter - The following line can be used to open the GIFter app directly:
sfdx force:org:open --path lightning/n/GIFter
Create the Unlocked Package
- There are two parts to a package:
- Package: manifest about what you’re going to create
- Package Version: snapshot in time of the metadata and code that relates to what you’re building and installing
- Step 1 is to create the package, which contains info that’s unlikely to change, like the
nameanddescription. Steps to complete this follow.
- Open
sfdx-project.jsonin a text editor.
{
  "packageDirectories": [
    {
      "path": "force-app",
      "default": true
    }
  ],
  "namespace": "",
  "sfdcLoginUrl": "https://login.salesforce.com",
  "sourceApiVersion": "55.0"
}
- Delete existing parameters like
id,versionNameandversionNumberas needed.
- Create the package using
sfdx force:package:create --name GIFter --description "Using GIPHY to find GIFs and post to Chatter" --path force-app --packagetype Unlocked --targetdevhubusername DevHub
The output will be similar to the following:
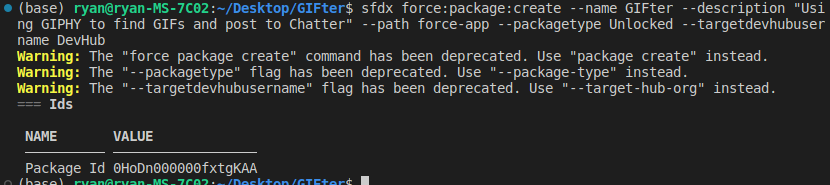
- As needed, you can check the package alias or package ID created in your Dev Hub by running
sfdx force:package:list
Create the Package Version
- Next step is to create a specific version of the package, which is the artifact that’s installed into various orgs. As you make updates to the app, you create new package versions that contain the updated source.
- Commands below may need to be updated to substitute your specific info
- Commands below may need to be updated to substitute your specific info
- Open the
sfdx-project.jsonfile. Thepackage:createcommand has updated the file to include important details about the package. Ex:packageDirectoriesshows the package name, with placeholders forversionNameandversionNumberpackageAliasesmaps the package name (alias) to its corresponding package ID (starts with0Ho)versionNameis up to the developer, and isn’t required to change with each new version that’s createdversionNumberauto-increments based on the use of theNEXTkeyword- Remaining items can be left alone
{
  "packageDirectories": [
    {
      "path": "force-app",
      "default": true,
      "package": "GIFter",
      "versionName": "ver 0.1",
      "versionNumber": "0.1.0.NEXT",
      "versionDescription": "Using GIPHY to find GIFs and post to Chatter"
    }
  ],
  "namespace": "",
  "sfdcLoginUrl": "https://login.salesforce.com",
  "sourceApiVersion": "55.0",
  "packageAliases": {
    "GIFter": "0HoDn000000fxtgKAA"
  }
}
- As examples, imagine you’re ready to release the first version of GIFter, so you update:
versionNameto Summer ‘22 andversionNumberto 1.0.0.NEXT.- See below. Save.
{
  "packageDirectories": [
    {
      "path": "force-app",
      "default": true,
      "package": "GIFter",
      "versionName": "Summer '22",
      "versionNumber": "1.0.0.NEXT",
      "versionDescription": "Using GIPHY to find GIFs and post to Chatter"
    }
  ],
  "namespace": "",
  "sfdcLoginUrl": "https://login.salesforce.com",
  "sourceApiVersion": "55.0",
  "packageAliases": {
    "GIFter": "0HoDn000000fxtgKAA"
  }
}
- Create your package version with
sfdx force:package:version:create --package GIFter --path force-app --installationkey test1234 --wait 10 --targetdevhubusername DevHub. - This operation can take several minutes. When done, the output will be similar to that shown below. It provides the necessary information to install this package version in an org.

Install and Test the Package Version in a Scratch Org
- Best practice is to install the newly-created package in a Scratch Org before putting it into any Sandbox orgs or Production orgs. Steps to do this follow:
- Create the scratch org:
sfdx force:org:create --setdefaultusername --definitionfile config/project-scratch-def.json - Install the package into the scratch org using the alias for the package version:
sfdx force:package:install --wait 10 --publishwait 10 --package [email protected] --installationkey test1234 --noprompt. Once done, it will show this message:Successfully installed package [04t_xxx] - Assign the permission set:
sfdx force:user:permset:assign --permsetname GIFter - Open the scratch org and see if things worked as expected:
sfdx force:org:open --path lightning/n/GIFter
Install the Package Version in Your Trailhead Playground (TP)
- Next, install the package version into your Trailhead. It uses several of the same commands.
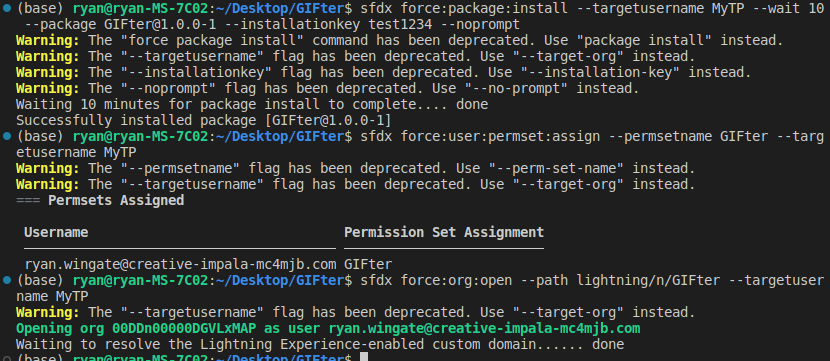
- Install the package, targeting your TP:
sfdx force:package:install --targetusername MyTP --wait 10 --package [email protected] --installationkey test1234 --noprompt - Assign the permission set:
sfdx force:user:permset:assign --permsetname GIFter --targetusername MyTP - Open the org and run the app:
sfdx force:org:open --path lightning/n/GIFter --targetusername MyTP
Update Your Unlocked Package
- The company is going to grow and change over time, as will your apps. Unlocked packages provide a robust and easy way to test, package, and deploy changes to your apps. Here’s the steps to test changes:
sfdx force:org:create -s -f config/project-scratch-def.jsonsfdx force:source:pushsfdx force:user:permset:assign -n GIFtersfdx force:org:open -p lightning/n/GIFter
- More practically:
- Change the
sfdx-project.jsonfile again to update theversionNumberto reflect the new version of the package. Minor changes might result in incrementing theversionNumberto 1.1.0.
{
   "packageDirectories": [
      {
         "path": "force-app",
         "default": true,
         "package": "GIFter",
         "versionName": "Summer '22",
         "versionNumber": "1.1.0.NEXT"
      }
   ],
   "namespace": "",
   "sfdcLoginUrl": "https://login.salesforce.com",
   "sourceApiVersion": "55.0",
   "packageAliases": {
      "GIFter": "0Hoxxx",
      "[email protected]": "04txxx"
   }
}
- Create a package version containing your app with updated source:
sfdx force:package:version:create -p GIFter -d force-app -k test1234 --wait 10 -v DevHub - Install and test the package version in a fresh scratch org:
sfdx force:org:create -s -f config/project-scratch-def.jsonsfdx force:package:install --wait 10 --publishwait 10 --package [email protected] -k test1234 --nopromptsfdx force:user:permset:assign -n GIFtersfdx force:org:open -p lightning/n/GIFter
Update Your Unlocked Package
Install New Package Version in Your Trailhead Playground (TP)
- Install the package version in the TP:
sfdx force:package:install -u MyTP --wait 10 --package [email protected] -k test1234 --noprompt - Open your TP and run the app:
sfdx force:org:open -p lightning/n/GIFter -u MyTP
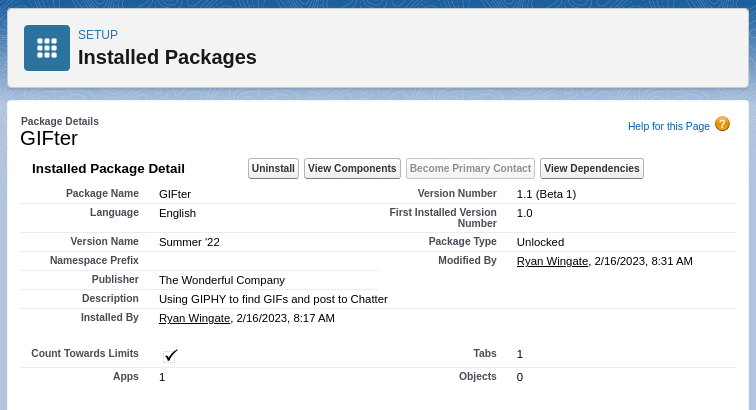
- To check the installed version of your packages, go to:
- Setup > Quick Find > “Installed Packages” > Installed Packages, then select, for example, GIFter