Share CRM Data with Your Partners
Launch Your Trailhead Playground
Build a bare-bones partner portal. Share CRM data with your partners using a portal.- Goal of this project is to introduce Salesforce data-sharing capabilities that let you securely share CRM data with partners outside Salesforce.
- The specific requirements are outlined below. This project involves identifying the actual sharing mechanism required to meet these requirements (thereby answering the How is it shared question).
- Actual Steps:
- Create a bare-bones partner portal using Partner Central
- Set up an external sharing model
- Create partner accounts and users
- Add a new user to the Salesforce role hierarchy
- Use sharing rules to share records via role hierarchies and account roles
- Use a sharing set to share records
- Create an account relationship to share records
- The specific requirements are outlined below. This project involves identifying the actual sharing mechanism required to meet these requirements (thereby answering the How is it shared question).
| What are you sharing? | Who owns it? | Who are you sharing it with? | How is it shared? |
|---|---|---|---|
| Opportunities | Partner user | Partner users in the same account, and Salesforce users in the role hierarchy | Account roles in the role hierarchy |
| Opportunities | Partner user | Partner users in a different account | Sharing rule |
| Cases | Customer user | Other customer users on the same account | Sharing set |
| Opportunities | Partner or internal users | Partner users associated to a different account | Account relationship |
Create a Partner Portal, Enable Partner Account and Users, and Add Members
Create a Partner Portal. Add Partner User Actions to the Account and Contact Page Layouts in Lightning Experience. Enable Partner Accounts and Create Partner Users. Add Profiles to Your Portal’s Membership.- Video located here provides a brief overview of how portals, communities, sites, and their users live within the Salesforce org.
- Create a Partner Portal via Setup > Quick Find > “Digital Experiences” > Enable Digital Experiences checkbox
- Select a domain name that will be recognizable to your users - this cannot be changed after digital experiences are enabled.
- For example, if
MyCompany.na162.force.comis the domain, sample experience URLs would beMyCompany.na162.force.com/partners
- For example, if
- Change the number of partner roles to 2 via Setup > Digital Experiences > Settings > Role and User Settings > Number of Partner Roles = 2
- Set up a bare-bones partner portal via Setup > Quick Find > “Digital” > Digital Experiences > All Sites > New
- Select Partner Central template, name site Ursa Major, add UrsaMajor to end of the URL so URL ends with
/UrsaMajor - After setup, will be taken to “Experiences Workspace.” The portal is in “Preview” status, which means it isn’t deployed yet.
- Select Partner Central template, name site Ursa Major, add UrsaMajor to end of the URL so URL ends with
- Add Partner User Actions to the Account and Contact Page Layouts in Lightning Experience
- After enabling digital experiences in an org, Salesforce adds specific actions to your account and contact page layouts so you can create partner accounts and partner users.
- If Enable as Partner is not available as an action on Contact and Account page layouts, then:
- Go to Object Manager > Account | Page Layouts | Account Layout > Mobile & Lightning Actions > drag the Enable as Partner and Disable Partner Account buttons to Salesforce Mobile and Lightning Experience Actions sections.
- Same process for Contact
- If Enable as Partner is not available as an action on Contact and Account page layouts, then:
- Enable Partner Accounts and Create Partner Users
- Completed with the Enable As Partner and Enable Partner User
- After enabling Accounts as partners, you can convert their contacts to Partner Users.
- Partner users are Salesforce users with access to CRM objects like opportunities, leads, and campaigns.
isPartneris set to True on the Account- Best practice when enabling partner users would be to assign them to a profile based on a clone of the Partner Community User profile. The user permissions for that new profile should be carefully reviewed and adjusted.
- To allow using standard external profiles for self-registration, check the “Allow using standard external profiles for self-registration, user creation and login” in Setup > Digital Experiences > Settings.
- Add Profiles to Your Portal’s Membership
- Add Members to your portal via: Setup > Digital Experiences > All Sites > “Workspaces” link next to the new Ursa Major portal, then “Administration”, then “Members”. Add the profiles that should be members of the community to the community. Then, save.
- Publish the portal via: Setup > Digital Experiences > All Sites > “Builder” link next to the new Ursa Major portal. Then, “Publish”.
- Activate the portal via: Setup > Digital Experiences > All Sites > “Workspaces” link next to the new Ursa Major portal, then “Administration”, then “Activate”
Set Your Org’s External Org-Wide Defaults
External Org-Wide Defaults. External Org-Wide Defaults Considerations. Setting and Testing External Org-Wide Defaults. Add Opportunities to the Navigation Menu. Test Opportunity Visibility in the Ursa Major Partner Portal.- Video located here:
- Describes external org-wide defaults
- Lists considerations for using external org-wide defaults
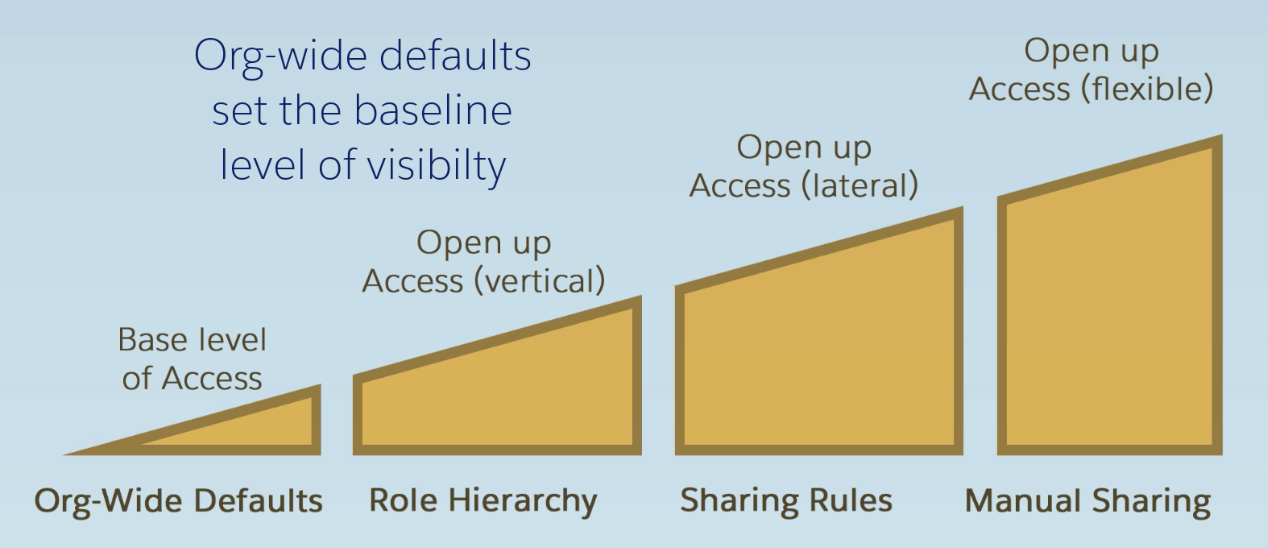
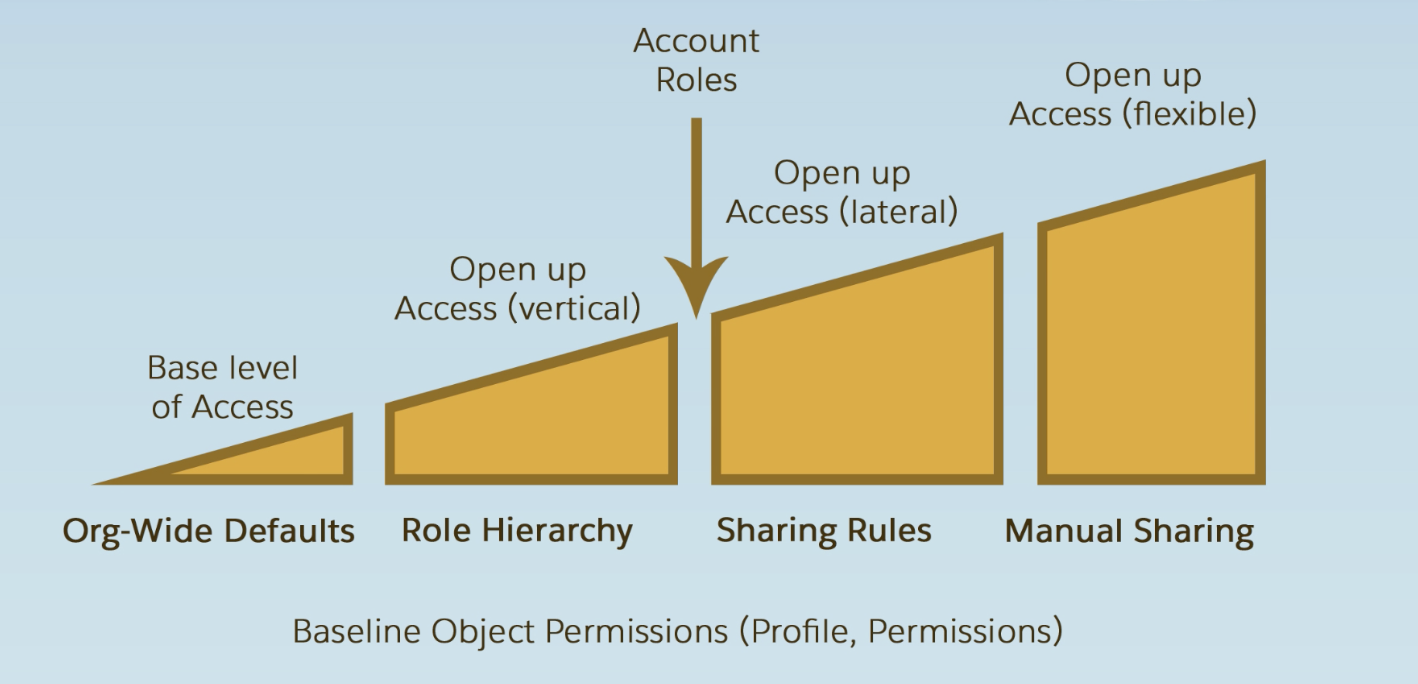
- External Org-Wide Defaults
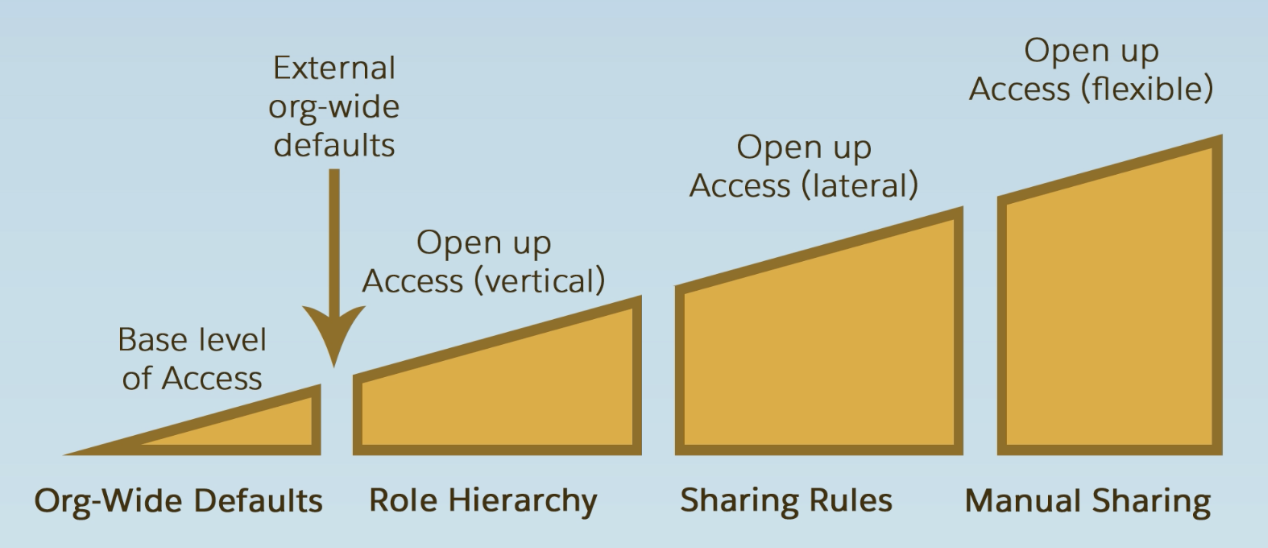
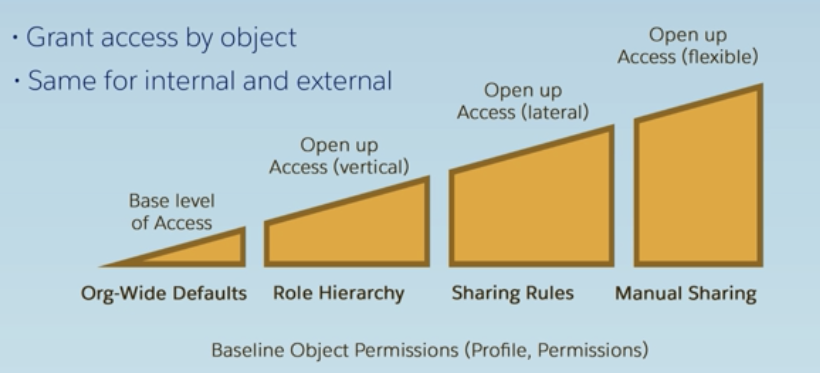
- Recall that Org-Wide Defaults set the baseline level of visibility for each object for your internal Salesforce users.
- After launching an Experience Cloud site for External Users, those users get the same org-wide access as internal users. If in the future we need a different level of access for external users, we enable External Org-Wide Defaults (via: Setup > Security > Sharing Settings), which lets us set different default access for external and internal users.
- Note these external org-wide defaults do not extend to Guest Users (users of a portal or community who are not logged in). Access for Guest Users is Private for all objects.
- Guest users' access can be opened up with other sharing mechanisms, like sharing rules.
- Note these external org-wide defaults do not extend to Guest Users (users of a portal or community who are not logged in). Access for Guest Users is Private for all objects.
- After launching an Experience Cloud site for External Users, those users get the same org-wide access as internal users. If in the future we need a different level of access for external users, we enable External Org-Wide Defaults (via: Setup > Security > Sharing Settings), which lets us set different default access for external and internal users.
- External Org-Wide Defaults Considerations
- Not all objects can have an external sharing model. The following can:
- Accounts and associated Contracts and Assets, Assets, Cases, Individuals, Opportunities, Orders, Custom Objects, Users
- Recommended best-practice is to set default external access to private for all objects, and then opening up access using other means.
- If you want to expose reports and dashboards on any objects to external users (like partners), you must set the external org-wide default to private.
- External org-wide default can’t be more permissive than the internal one (Ex: external users cannot have Public Read/Write/Transfer if internal users only have Public Read/Write)
- Setting and Testing External Org-Wide Defaults
- Set org-wide defaults via: Setup > Quick Find > “Sharing Settings” > Sharing Settings
- Add Opportunities to the Navigation Menu
- Add items to the navigation menu via the Digital Experiences Builder
- Click the navigation bar, then “Edit Default Navigation”, then “Add Menu Item”, then finish configuring the new menu item.
- Test Opportunity Visibility in the Ursa Major Partner Portal
- Easiest way to log in to an experience site as system admin is via: Setup > Digital Experiences > All Sites > [Site URL]
- Easiest way to log in to an experience site as a specific user is via: Log in to Site as User option on that external user’s contact record.
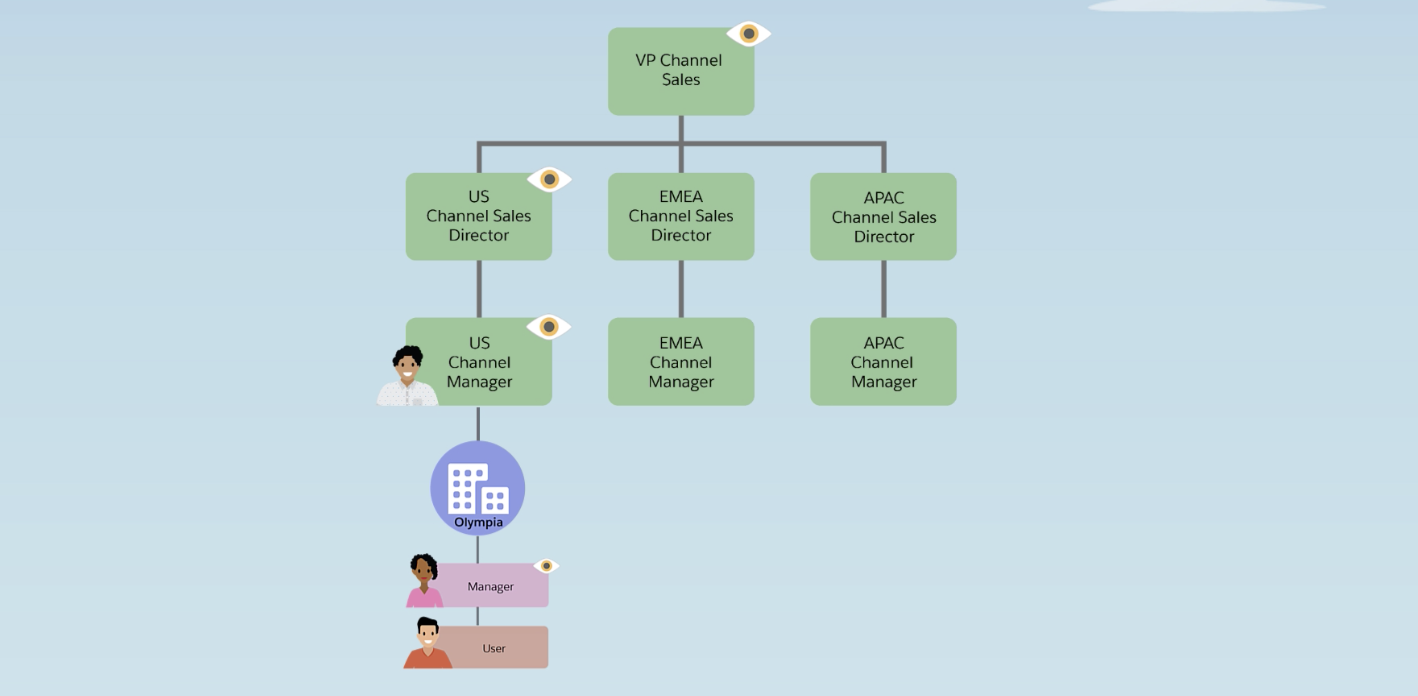
Set Up Account Roles and the Role Hierarchy
Recap. Assign Roles to Users. Considerations When Using Account Roles. Add a Channel Accousv xcnt Manager to the Role Hierarchy. Test Opportunity Visibility.- Video located here:
- Describes how role hierarchies work for external users
- Lists considerations you need to make in order to use role hierarchies for external users
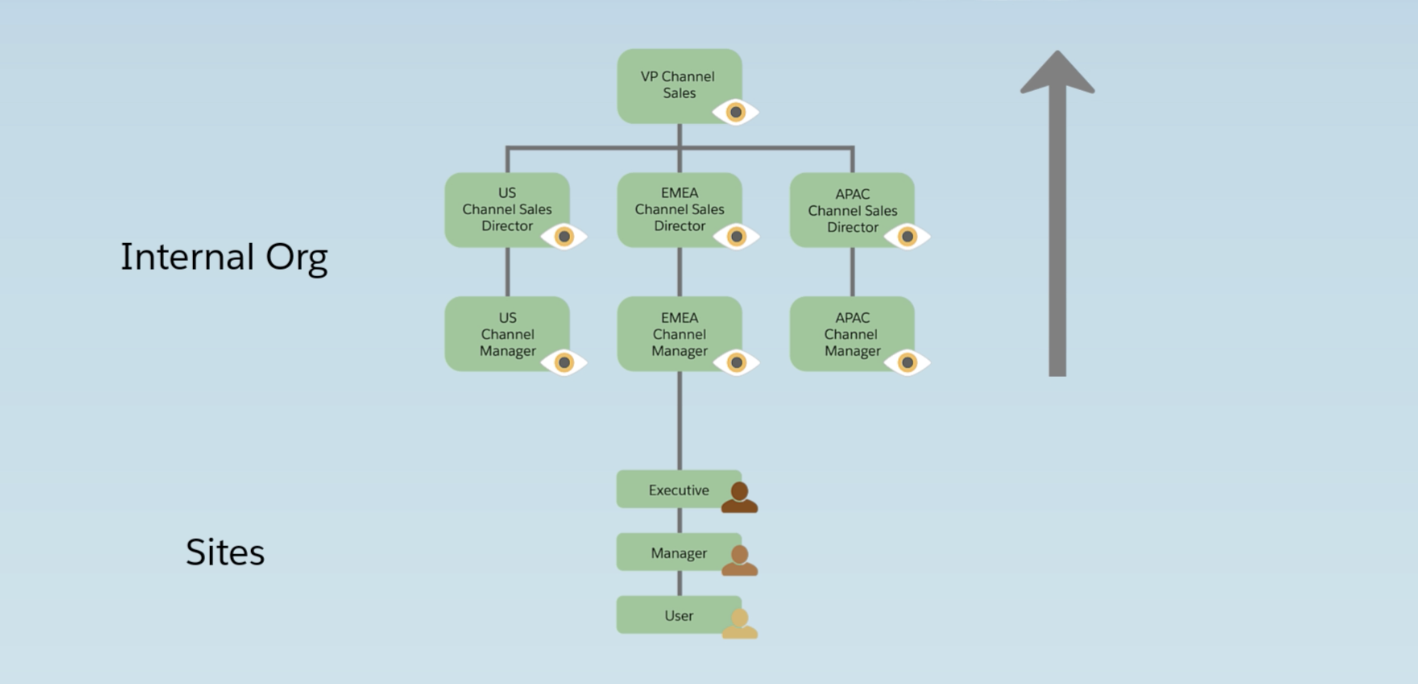
- Recap
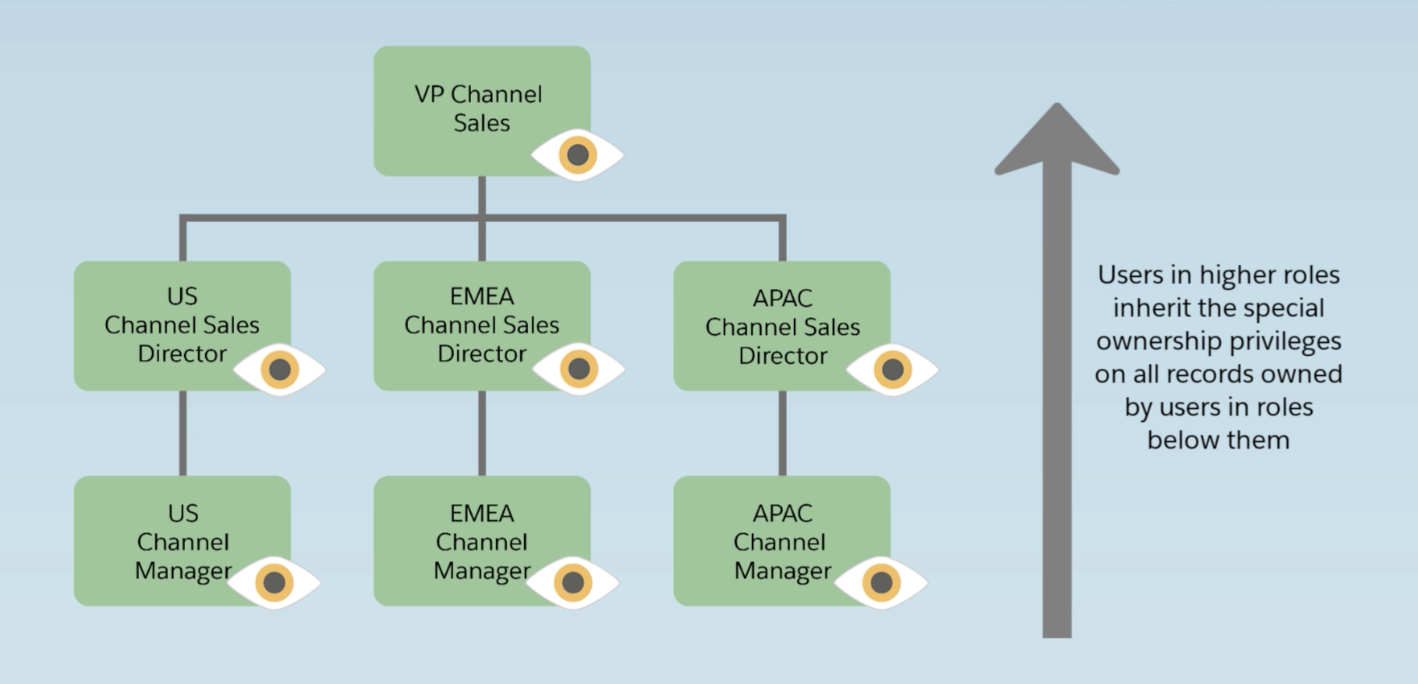
- Recall that users in higher roles inherit the ownership privileges on al records owned by users in roles below them.
- The role hierarchy concept is extended to external users by assigning Account Roles which are specific to external users in Experience Cloud sites like Communities and Portals.
- Roles are first associated with Accounts, and then by extension to Users.
- Customer or Partner accounts can have up to three Account Roles: User, Manager, Executive
- These roles in turn can roll up to internal roles - see example in imaage above.
- Assign Roles to Users
- Considerations When Using Account Roles
- Account roles are created with first Experience Cloud site user
- Default is one role per account. Recommendations os to keep the default one account role, and use other sharing mechanisms to increase visibility of records if you need to since an increase in the number of roles can affect performance.
- Account roles are specific to accounts
- Default roles max: 50,000. Absolute max: 500,000 (requires Salesforce approval)
- Note that account roles can quickly add up since Salesforce generates account roles for each account. Ex: if you set up two partner roles in your org, and have 100 partner accounts, you create 200 account roles.
- You can only assign account roles to external users who have a Customer Community Plus or Partner Community license.
Use Sharing Rules for External Users
Sharing Rules for External Users. Sharing Rule Using an Account Role. Criteria-Based Sharing Rule Using a Public Group.- Video located here:
- Describes how sharing rules work for external users
- Describes which licenses you can use with sharing rules
- Sharing Rules for External Users
- Recall Sharing Rules:
- Grant additional access to records on an object-by-object basis
- Work the same way for external users as they do for internal users
- Which Records:
- Those owned by certain users
- Meeting certain criteria
- With Which Users:
- Public Groups
- Roles
- Roles and Subordinates
- Salesforce creates and maintains the following site-specific groups:
- Portal Roles
- Portal Roles and Subordinates
- Roles, Internal and Portal Subordinates
- All Customer Portal Users and All Partner Users public groups
- Channel Programs and Levels groups
- Admins can also set up public groups for sharing purposes
- Sharing Rule Using an Account Role
- Set up via: Settings > Security > Sharing Settings > “Opportunity” Sharing (or similar) > New
- Name Rule, then select Rule Type “Based on record owner”
- Criteria-Based Sharing Rule Using a Public Group
- Set up a Public Group via: Setup > Quick Find > “Public” > Public Groups
- Ex: “Partner Managers and Channel Director” public group could include:
- Role: Director, Channel Sales
- Portal Role: Portal Role: Edge Communications Partner Manager, Portal Role: Express Logistics and Transport Partner Manager
- Ex: “Partner Managers and Channel Director” public group could include:
- Set up via: Settings > Security > Sharing Settings > “Account” Sharing (or similar) > New
- Name Rule, then select Rule Type “Based on criteria”
Use Site-Specific Sharing
Sharing Records with High-Volume Portals and Sites. Working with Sharing Sets.- Video located here:
- Describes sharing mechanisms for external users
- Explains which license types can use these sharing mechanisms

- Sharing Sets is a sharing mechanism only available to external users
- Sharing Sets use Profiles
- Unlike Sharing Rules, which use Roles & Public Groups
- Sharing Sets can use one of two concepts:
- Direct Lookup on the record you want to share
- Ex: Account associated to a Case.
- Customer Users on the same Account could have access to all of their Cases.
- Indirect Lookup
- Ex: Account associated to an Asset associated to a Case.
- Service Contractors could have access to the Accounts of customers who purchased a particular Asset.
- Direct Lookup on the record you want to share
- Considerations:
- Sharing Sets are available to all community licenses
- Records shared are not visible via org-wide defaults, role hierarchies, or sharing rules
- Only one sharing set can be created per Object and per Profile
- Data shared through sharing sets is visible in reports and dashboards
- Following objects are supported: Account, Asset, Case, Contact, Custom Objects, Service Contract, User, Work Order
- Sharing Sets use Profiles
- Share Groups grant internal users access to records shared by Sharing Sets
- Considerations:
- Share group is associated to a sharing set
- One share group per sharing set
- Grant full access (read, write, edit) to records shared in a sharing set
- Considerations:
- Set up Sharing Sets via: Setup > Feature Settings > Digital Experiences > Settings > Sharing Set related list
Share Data Using an Account Relationship
Create Account-to-Account Business Relationships. When to Use Account Relationships. Check Opportunity Data Visibility. Share Opportunities Using Account Relationships. Important. See How Much You Shared!- Create Account-to-Account Business Relationships
- Use Account Relationships when you need more granular control over the info sharing between partner accounts.
- When to Use Account Relationships
- Use Account Relationships to track business relationships between two partner accounts. Examples:
- A distributor needs access to a subset of the customer accounts owned by his reseller so he can effectively suppor them.
- A distributor who needs to collaborate with a reseller on specific deals.
- Share Opportunities Using Account Relationships
- Enable Account Relationships via: Setup > Quick Find > “Digital” > Digital Experiences > Settings > Enable Account Relationships checkbox
- Important: Once enabled, Account Relationships cannot be disabled
- Creates a new object in the org (Account Relationships)
- Only one sharing rule can contain the same Account Relationship tyle and Object type field values. For example, can only have one sharing rule thata combines the Lead.OwnerId Object Type and “Distributor” Account Relationship Type field value.
- Add the Account Relationship related lists to the Account page layout. Two related lists: Account Relationships: Account From and Account Relationships: Account To
- Create a new Account Relationships data sharing rule via: Setup > Quick Find > “Account Relationships” > Account Relationships Data Sharing Rule Settings > New
- An account relationship data sharing rule identifies:
- the account relationship type,
- the type of information that you want to share, and
- the access level to the records.
- Orgs come with severaal account relationship types in place, but more can be added if needed
- An account relationship data sharing rule identifies:
- Define specific distributor/reseller relationships via: Accounts > Select an Account > Navigate to the Account Relationships: Account From related list > New
- In Account Relationships:
- Account From is the account that gets access to data, and
- Account To is the account that gives access to its data
These notes were taken while studying using Salesforce's free self-learning portal, Trailhead.