Aura Components Basics
Before You Start
Determine if you have the skills to complete this module. Create a required custom object. Configure your org for Lightning components development.- Before You Start This Module
- My Domain is required to develop with Lightning components
- The Expense custom object described below is required for this module
- My Domain Is Already On in Your Trailhead Playground
- My Domain is already turned on in every Trailhead Playground
- My Domain lets you create a subdomain unique to your organization, so that it shows up as something company-specific, like https://mydomainname.my.salesforce.com instead of including the Salesforce instance, like https://na17.salesforce.com
- My Domain is required to create custom Lightning components and set up Single Sign-On (SSO) in an org - all production, Developer Edition, and trial orgs created Winter ‘21 or later get My Domain by default
- Define the Expense Custom Object
- Custom Object: Expense
- Custom Fields: Amount (number), Client (text), Date (date), Reimbursed (checkbox)
- Skills You Need to Complete This Module
- Lightning component framework requires code, so to complete this module:
- Should be comfortable reading and writing JavaScript
- Salesforce recommends getting started learning JavaScript with [http://jstherightway.org/](JavaScript The Right Way)
- Should know Apex, which is how you ready and write data from Salesforce
- You can pass the module without know too much Apex, but real apps require writing plenty of Apex
- Salesforce recommends the Apex Basics & Database module to learn Apex
- If coming to Lightning components from Visualforce, eventually complete the Apply Visualforce Skills to Lightning Components
- Should be comfortable reading and writing JavaScript
- Passing the module without those skills is possible but may be frustrating
- Without those skills you “won’t really be ready to uses Lightning components to write apps”
- Lightning component framework requires code, so to complete this module:
- Custom Object: Camping Item
- Custom Fields: Quantity (Number, required), Price (Currency required), Packed (Checkbox)
Get Started with Aura Components
Describe what the Lightning Components framework is, and what it’s used for. List four key differences between Lightning Components and other web app frameworks. List at least five different ways you can use Lightning Components to customize Salesforce.- Getting Started with Lightning Components
- The Lightning Components framework is the “most exciting and powerful app development technology we’ve built in years”
- The Salesforce app and Lightning Experience were built with it
- What Is the Lightning Component Framework?
- “The Lightning Component framework is a UI framework for developing web apps for mobile and desktop devices”
- Modern framework for building single-page applications with dynamic, responsive user interfaces for Lightning Platform apps
- An app framework is a collection of code and services that makes it easier to create your own custom apps, without having to write all the code
- Other examples: Ruby on Rails, Grails, AngularJS, Django, CakePHP, etc
- Web apps have evolved from simple, page-by-page oriented experiences to highly responsive apps that have all the same behavior and interactivity of native apps, on desktops and especially mobile devices
- Runs from a single URL and then continuously as you use it
- Plumbing is handled by a framework, like Lightning Component framework
- Uses JavaScript on the client side, Apex on the server side
- Modern framework for building single-page applications with dynamic, responsive user interfaces for Lightning Platform apps
- “The Lightning Component framework is a UI framework for developing web apps for mobile and desktop devices”
An Example Aura Component
<aura:component>
    <aura:attribute name="expense" type="Expense__c"/>
    <aura:registerEvent name="updateExpense" type="c:expensesItemUpdate"/>
    <!-- Color the item green if the expense is reimbursed -->
    <lightning:card title="{!v.expense.Name}" iconName="standard:scan_card"
                    class="{!v.expense.Reimbursed__c ?
                           'slds-theme_success' : ''}">
        <aura:set attribute="footer">
            <p>Date: <lightning:formattedDateTime value="{!v.formatdate}"/></p>
            <p class="slds-text-title"><lightning:relativeDateTime value="{!v.formatdate}"/></p>
        </aura:set>
        <p class="slds-text-heading_medium slds-p-horizontal_small">
            Amount: <lightning:formattedNumber value="{!v.expense.Amount__c}" style="currency"/>
        </p>
        <p class="slds-p-horizontal_small">
           Client: {!v.expense.Client__c}
        </p>
        <p>
            <lightning:input type="toggle"
                             label="Reimbursed?"
                             name="reimbursed"
                             class="slds-p-around_small"
                             checked="{!v.expense.Reimbursed__c}"
                             messageToggleActive="Yes"
                             messageToggleInactive="No"
                             onchange="{!c.clickReimbursed}"/>
        </p>
    </lightning:card>
</aura:component>
- Code above is XML, including static HTML and custom Aura component tags
<aura:component>: starts off the sample<lightning:card>: creates a container around a group of info<lightning:formattedDateTime>: displays formatted date and time<lightning:relativeDateTime>: displays the relative time difference between current time and provided timeonchange="{!c.clickReimbursed}: attribute on toggle switch, that’s really a fancy checkbox that slides right and left to represent checked and unchecked values. Says “When changed, call the controller’sclickReimbursedfunction.”
({
    clickReimbursed: function(component, event, helper) {
        let expense = component.get("v.expense");
        let updateEvent = component.getEvent("updateExpense");
        updateEvent.setParams({ "expense": expense });
        updateEvent.fire();
    }
})
- Code above is the component’s client-side controller, written in JavaScript
- In Aura Component programming model, components are bundles of code:
- Includes markup like the earlier sample, in the “.cmp resource”
- Can include JavaScript code, in a number of associated resources
- In Aura Component programming model, components are bundles of code:
- What About Visualforce?
- Visualforce and Lightning Components have different strengths
- Visualforce isn’t going away, and existing apps don’t need to be converted
- Lightning Components are optimzied to perform well on mobile, but Visualforce is not
- More specifics are covered in the Develop for Lightning Experience module
- Visualforce and Lightning Components have different strengths
- What About AngularJS, React, and Those Other JavaScript Frameworks?
- Salesforce says these frameworks are a great way to build Lightning Platform apps
- Recommended to use them with Visualforce, using a “container page,” and package your chosen framework and app code into static resources
- Third-party JavaScript frameworks + Lightning components may be a bit cumbersome
- Lightning Component framework and most modern frameworks overlap quite a bit in features, so best to use Lightning Components, which are quicker to develop with
- Salesforce says these frameworks are a great way to build Lightning Platform apps
- Where You Can Use Lightning Components
- Can create apps hosted on Salesforce or hosted on other platforms, including embedding them into apps from those platforms
- Add Apps to the Lightning Experience App Launcher
- The App Launcher contains any custom apps you have created
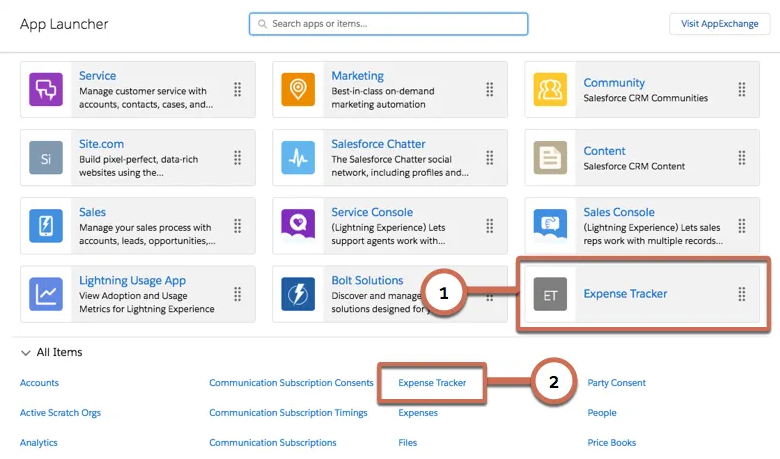
- Add Apps to Lightning Experience and Salesforce App Navigation
- You can also add them as tabs in other apps
- Create Drag-and-Drop Components for Lightning App Builder and Experience Builder
- Lightning components can be added to pages using Lightning App Builder and Experience Builder
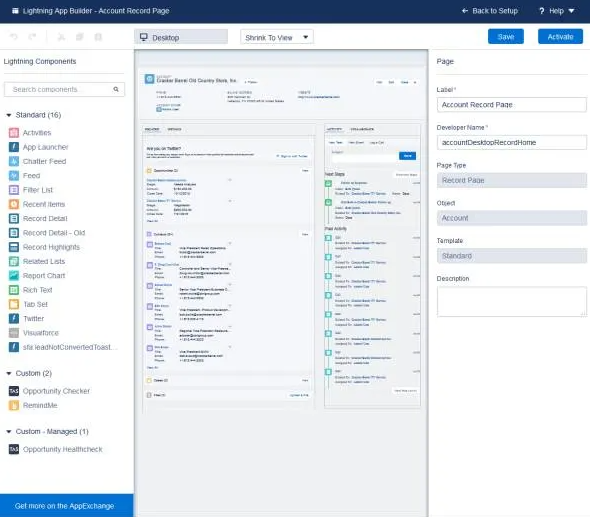
- Add Lightning Components to Lightning Pages
- Lightning components can be added to pages using Lightning App Builder and Experience Builder
- Add Lightning Components to Lightning Experience Record Pages
- Lightning components can be added to pages using Lightning App Builder and Experience Builder
- Launch a Lightning Component as a Quick Action
- Create actions using a Lightning component, and add the action to an object’s page layout to make it accessible

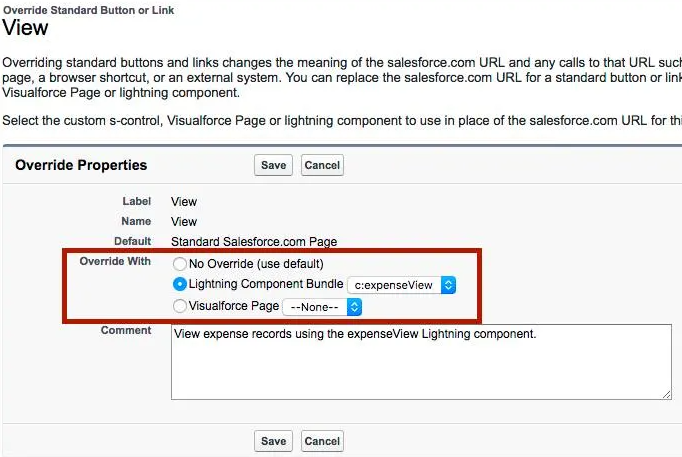
- Override Standard Actions with Lightning Components
- Closely parallels overriding an action with a Visualforce page
- Create Stand-Alone Apps
- These can be used independently from the standard Salesforce environment

- Run Lightning Components Apps Inside Visualforce Pages
- Add Lightning components to Visualforce pages to combine features built using both solutions
- Run Lightning Components Apps on Other Platforms with Lightning Out
- Extends Lightning apps, acting as a bridge to surface Lightning components in any remote web container, so you can use your Lightning components inside of an external site like Sharepoint or SAP
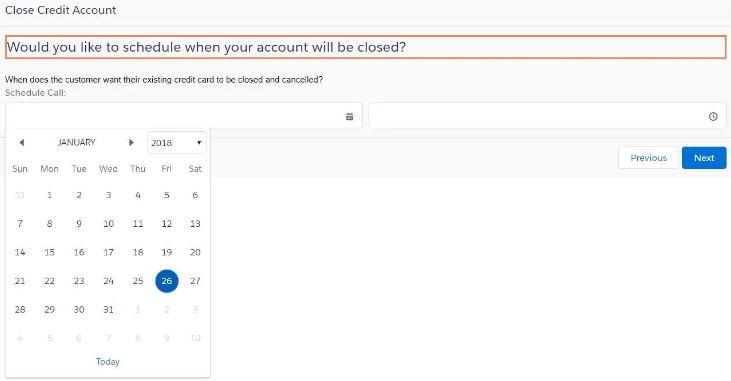
- Customize Flow Screens
- With a custom Lightning component, you can fully customize the look-and-feel and functionality of a screen flow
- Lightning Components framework:
- Is a UI framework for developing web apps for mobile and desktop devices
- Uses JavaScript on the client side and Apex on the server side
- Is a modern framework for building single-page applications
- With the Lightning Component framework, you can build:
- Standalone apps
- Components to use inside Visualforce pages
- Drag-and-drop components for Lightning App Builder
- Lightning component framework is different from other web app frameworks in that:
- It is optimized for both mobile and desktop experiences and proves it with Salesforce1 and Lightning Experience
- It connects natively with services provided by the Salesforce platform
- It has specific opinions about how data access is performed and has specific security requirements
Create and Edit Aura Components
Create and edit Aura component bundle resources in the Developer Console. Create a “harness” application for testing components in development. Perform the edit and reload cycle for previewing components in development. List the different resources that make up an Aura component bundle.- Creating and Editing Aura Components
- Can write Aura components from the Developer console
- Create Aura Components in the Developer Console
- Create a new Aura component via: File > New > Lightning Component, for this example called
helloWorld - The component that is generated contains the opening and closing tags for an Aura component:
<aura:component ></aura:component> - For this example, add
<p>Hello Lightning!</p>to the markup between the Aura application tags - To view an Aura component, you need to run the component inside a container app, called a “container”
- Example containers: “Lightning Experience” or “Salesforce apps”, an app you build with Lightning App Builder, or any of the things described at the end of the “Get Started with Aura Components” section
- For now, will create a simple “
harnessApp” to display it
- Create a new Aura component via: File > New > Lightning Component, for this example called
- Create a “
harnessApp":- File > New > Lightning Application
- Name it “harnessApp”
- Add
<c:helloWorld/>to the component markup, so it shows up as shown below. This adds thehelloWorldapp to theharnessAppapp. Now a “Preview” button shows up in the app. - Saving and clicking “Preview” will open a tab containing the
helloWorldAura app code
- File > Open > Lightning Resources lets you open a bunch of Lightning resources all at once
- Note that the URL for the preview is the permanent home of the app, which comes with the format
https://MyDomainName.lightning.force.com/Namespace/AppName.app
In trailhead orgs, the c represents the default namespace
helloWorld:
<aura:application >
	<p>Hello Lightning!</p>
</aura:application>
harnessApp:
<aura:application >
	<c:helloWorld/>
</aura:application>

- What Is a Component?
- Components are bundles that include a definition resource, written in markup, and may include other resources such as a controller, stylesheet, etc
- Resources are like files, but stored in Salesforce
- Bundles are sort of like folders - they group the related resources for a single component. The resources are auto-wired (hooked up) automatically.
- Clicking the Style button in developer console opens a new tab for the style resource that was added to the bundle
- The
THISkeyword is the scoping string named for your component - Clicking the CONTROLLER and HELPER items adds those resources to the bundle. Then, the bundle looks like the following:
helloWorld: component bundlehelloWorld.cmp: component’s definitionhelloWorldController.js: the component’s controller, or main JavaScript filehelloWorldHelper.js: the component’s helper, or secondary JavaScript filehelloWorld.css: the component’s styles
- Components are bundles that include a definition resource, written in markup, and may include other resources such as a controller, stylesheet, etc
.THIS {
}
p.THIS {
    font-size: 24px;
}
- What Is an App?
- apps are a special components - they are different from a component in two meaningful ways:
- An app uses
<aura:application>tags instead of<aura:component>tags - Only an app has a Preview button in Developer console
- An app uses
- apps are a special components - they are different from a component in two meaningful ways:
- What Are Apps For?
- Practical differences between Apps and Components:
- You can add a component to an app, but cannot add an app to another app, and cannot add an app to a component
- An app has a standalone URL you can access while testing that you can publish to your users - these are often called “my.app”
- Can’t add apps to Lightning Experience or Salesforce app, only components
- So, usually you build all your “app” functionality inside a top-level component, then add that component to another container
- In the real world, creating an Aura app means building functionality inside a component bundle, not an application bundle
- Practical differences between Apps and Components:
- Components, Containing Components, Containing… Components!
- Composition: Common design pattern is to keep nesting components inside each other, starting with simple, “fine-grained” components then assembling those components upward into new components with higher-level functionality
harnessApp:
<aura:application >
	<c:helloWorld/>
</aura:application>
helloWorld
<aura:component >
    <c:helloHeading/>
	<p>Hello Lightning!</p>
</aura:component>
helloHeading
<aura:component>
    <h1>W E L C O M E</h1>
</aura:component>
harnessApp:
<aura:application >
	<c:camping/>
</aura:application>
camping:
<aura:component >
	<c:campingHeader/>
    <c:campingList/>
</aura:component>
campingHeader:
<aura:component >
	<h1>Camping List</h1>
</aura:component>
campingHeader.css:
.THIS {
    font-size: 18px;
}
campingList:
<aura:component >
	<ol>
    	<li>Bug Spray</li>
        <li>Bear Repellant</li>
        <li>Goat Food</li>
    </ol>
</aura:component>
Attributes and Expressions
Define attributes on your components, and pass attribute values into nested components. Understand the difference between a component definition and a component instance, and create multiple instances of a component. Create basic expressions to display changing and calculated values. Create conditional expressions for dynamic output.- Component Attributes
- Attributes on components are like instance variables in objects - a way to save values that change and name those value placeholders
- Attributes are defined using an
<aura:attribute>tag - Attributes themselves have attributes
- Required:
name,type - Optional:
default,description,required
- Required:
<aura:component>
    <aura:attribute name="message" type="String"/>
    <p>Hello! {!v.message}</p>
</aura:component>
- Expressions
- In snippet above, contents of
messageare output using the expression{!v.message} - Expressions are essentially a formula, or calculation, you place within expression delimiters:
{!and} - Expression values are any set of literal values, variables, sub-expressions, or operators that can be resolved to a single value
- You can use operators inside expressions as well, as show below:
{!$Label.c.Greeting + v.message} - Last, you can pass expressions to another component to set the value on that component. For example:
- In snippet above, contents of
<aura:component>
    <aura:attribute name="customMessage" type="String"/>
    <p> <c:helloMessage message="{!v.customMessage}"/> </p>
</aura:component>
- Value Providers
- The
v.part of the message above is called the value provider, a way to group, encapsulate, and access related data. They are a “hook” to access the component’smessageattribute, which is how you access all of a component’s attributes. - When an attribute of a component is on an object, access the values using dot notation, for example
{!v.account.Id}
- The
- Attribute Data Types
- Various attribute types are available, including:
- Primitives: Boolean, Date, Datetime, Decimal, Double, Integer, Long, String
- Standard Objects and Custom Objects: Account MyCustomObject__c
- Collections: List, Set, Map
- Custom Apex Classes
- Framework-specific types: Aura.Component or Aura.Component[] (not covered yet)
- Component in the example below has one attribute,
expense, a custom object- Purpose of component is to display the details of an expense by referencing the field on the
Expense__crecord using the{!v.expense.fieldName}expression - Note in example we’re using the
<lightning:input>component oftype="toggle"
- Purpose of component is to display the details of an expense by referencing the field on the
- Various attribute types are available, including:
<aura:component>
    <aura:attribute name="expense" type="Expense__c"/>
    <p>Amount:
        <lightning:formattedNumber value="{!v.expense.Amount__c}" style="currency"/>
    </p>
    <p>
        Client: {!v.expense.Client__c}
    </p>
    <p>
        <lightning:input type="toggle"
                         label="Reimbursed?"
                         name="reimbursed"
                         checked="{!v.expense.Reimbursed__c}" />
     </p>
    <!-- Other markup here -->
</aura:component>
- Other Aspects of Attribute Definitions
- default attribute: defines the default attribute value - used when the attribute is referenced and you haven’t set the attribute’s value yet
required: defines whether the attribute is required - default is falsedescription: defines a brief summary of the attribute and its usage
- Fun with Attributes and Expressions
- See example component,
helloPlayground, below:messageis an attribute ofhelloPlaygroundthat’s a complex data type- Accessing the third item will fail if someone creates a
c:helloPlaygroundwith only two messages - List Iteration section: shows a better way to work through all items in the list -
<aura:iteration>component repeats its body once per item, so it can accommodate lists of variable lengths - Conditional Expressions and Global Value Providers section: shows a way to choose between two possible outputs
- In object-oriented programming, there’s a difference between a class and an instance of that class. Components have a similar concept:
.cmp resource: definition of a class of a given component- When you put a component tag in a .cmp, you are creating a reference to (IE instance of) that component
- Example below creates eight references to (instances of) the
<c:helloMessage>component
- See example component,
harnessApp.app:
<aura:application >
	<c:helloPlayground/>
</aura:application>
helloPlayground.cmp:
<aura:component>
    <aura:attribute name="messages" type="List"
        default="['You look nice today.',
            'Great weather we\'re having.',
            'How are you?']"/>
    <h1>Hello Playground</h1>
    <p>Silly fun with attributes and expressions.</p>
    <h2>List Items</h2>
    <p><c:helloMessage message="{!v.messages[0]}"/></p>
    <p><c:helloMessage message="{!v.messages[1]}"/></p>
    <p><c:helloMessage message="{!v.messages[2]}"/></p>
    <h2>List Iteration</h2>
    <aura:iteration items="{!v.messages}" var="msg">
        <p><c:helloMessage message="{!msg}"/></p>
    </aura:iteration>
    <h2>Conditional Expressions and Global Value Providers</h2>
    <aura:if isTrue="{!$Browser.isIPhone}">
        <p><c:helloMessage message="{!v.messages[0]}"/></p>
    <aura:set attribute="else">
        <p><c:helloMessage message="{!v.messages[1]}"/></p>
        </aura:set>
    </aura:if>
</aura:component>
helloMessage.cmp:
<aura:component>
    <aura:attribute name="message" type="String"/>
    <p>Hello! {!v.message}</p>
</aura:component>
campingListItem.cmp:
<aura:component >
    <aura:attribute name="item"
                    type="Camping_Item__c"
                    required="True"
                    default="{Name:'Testing', Price__c:100, Quantity__c:1, Packed__c:false}"/>
    <p>{!v.item.Name}</p>
    <p><lightning:formattedNumber value="{!v.item.Price__c }" style="currency"/></p>
    <p><lightning:formattedNumber value="{!v.item.Quantity__c }"/></p>
    <p><lightning:input type="toggle"
                        label="Packed?"
                        name="Packed"
                        checked="{!v.item.Packed__c}" /></p>
</aura:component>
Handle Actions with Controllers
Create a client-side controller to handle user actions. Read values from component attributes. Read values from user interface controls in your component. Write controller code in JavaScript that changes the user interface.- Handling Actions with Controllers
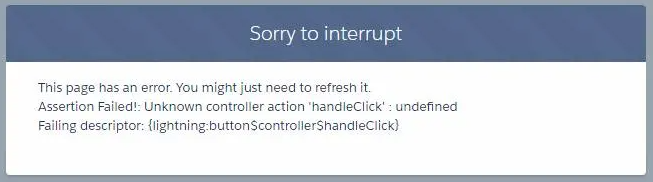
- Sections above this one all involved working with XML-style markup only - the components’ output hasn’t changed based on user input - this section introduces JavaScript
- The sample code below is intended to print a message based on which button is pressed, which requires the
{!c.handleClick}controller action, which is not written yet- For now, clicking the button gives the error that follows the code snippet, below
- Like
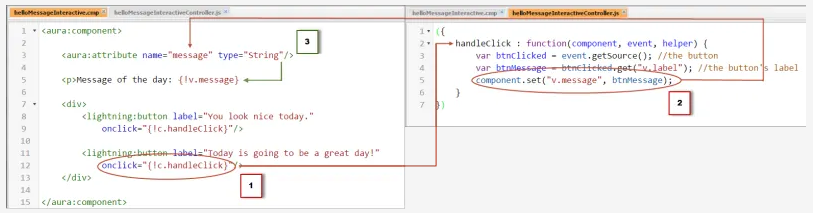
v.messageexpression from earlier,c.handleClickis a value provider with a property,handleClick.cis the value provider for the component’s client-side controllerhandleClickis a function defined in that controller{!c.handleClick}is a reference to an action handler in the component’s controller
<aura:component>
    <aura:attribute name="message" type="String"/>
    <p>Message of the day: {!v.message}</p>
    <div>
        <lightning:button label="You look nice today."
            onclick="{!c.handleClick}"/>
        <lightning:button label="Today is going to be a great day!"
            onclick="{!c.handleClick}"/>
    </div>
</aura:component>
- Uh, What’s a Controller?
- Controllers are collections of code that defines your app’s behavior when “things happen”, where things can mean user input, timer and other events, data updates, etc.
- One of the aspects of “Model-View-Controller”
- For Lightning Components, a controller is a resource in a component bundle that holds the action handlers for that component
- Action handlers are just JavaScript functions with particular function signatures
- Controller resources have an interesting format - they are JavaScript objects that contain a map of name-value pairs
- name is the name of an action handler, value is a function definition
- Controllers are collections of code that defines your app’s behavior when “things happen”, where things can mean user input, timer and other events, data updates, etc.
({
    handleClick: function(component, event, helper) {
        let btnClicked = event.getSource();         // the button
        let btnMessage = btnClicked.get("v.label"); // the button's label
        component.set("v.message", btnMessage);     // update our message
    }
})
- Beyond the Basics
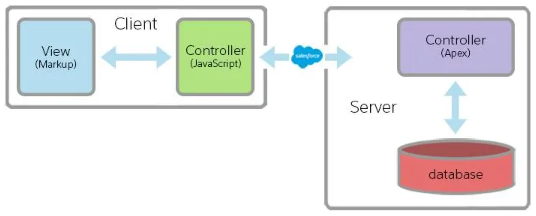
- In MVC paradigm, Components are views, Controllers are controllers
- Technically, Lightning Components are based on the View-Controller-Controller-Model or View-Controller-Controller-Database paradigm, not MVC (Model-View-Controller)
- “Controller” is doubled up because there is a server-side controller as well as a client-side controller. This unit focuses on the client-side controller.
- Distinction between model and database because in traditional MVC, the model is a programmatic abstraction (class, generally) between the underlying data storage (relational database) and the rest of the application. In Lightning Components, there’s no Apex class between
@AuraEnabledcontroller methods and DML operations, but sObjects are already an abstraction between Apex code and underlying storage. So, model/database differentiation is a bit muddy.
- Action Handlers
- “action handler”, “controller action”, and “controller function” are generally interchangeable terms
- At a high-level, when the button is clicked:
- Its action handler gets called
- In the action handler, the controller gets the button that was clicked, pulls the label text out of it, and sets the component’s
messageattribute to that text - The message of the day is updated
- Breaking down step 2, above:
- 2A. Action handler name, followed by anonymous function declaration - always declare them like this
- component—the component. In this case, it’s helloMessageInteractive.
- event—the event that caused the action handler to be called.
- helper—the component’s helper, another JavaScript resource of reusable functions.
- 2B.
eventis someone clicking the button, sincehandleClickis connected to<lightning:button>tag. Events have notion of a source, which is the thing that generated the event, so callingevent.getSource()gives a reference to the specific<lightning:button>that was clicked. - 2C. You can call
get()on any component and provide the name of the attribute you want to retrieve, in the formatv.attributeName, and the result is the attribute value. - 2D. Just as
get()reads a value from a component,set()writes a value. Note that whereasgetwas called onbtnClicked,setwas called on thehelloMessageInteractivecomponent itself.
- 2A. Action handler name, followed by anonymous function declaration - always declare them like this
handleClick: function(component, event, helper) {   // 2A - declaration
    let btnClicked = event.getSource();             // 2B - the button
    let btnMessage = btnClicked.get("v.label");     // 2C - the button's label
    component.set("v.message", btnMessage);         // 2D - update our message
}
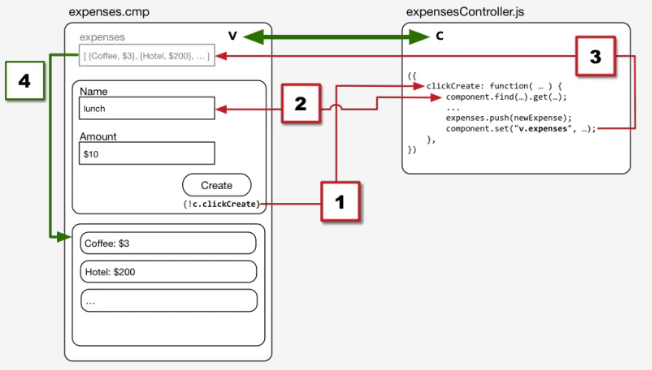
This is a common pattern that’s repeated on almost all components you create:
- Get values from child components,
- Possibly do some processing,
- Set values in the component.
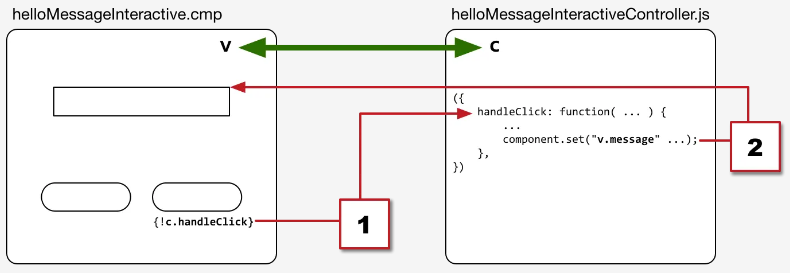
- The Aura Components View-Controller Programming Model
- Think of hooking up components to action handlers as “wiring them up”
- The different resources in an Aura component bundle are “auto-wired to each other” - the wiring takes the form of the
vandcvalue providers, which are automatically created and made available within your components- This auto-wiring takes place in
helloMessageInteractiveonly, though, between the.cmpand.jsresources. Green arrow below.
- This auto-wiring takes place in
- Wiring to hook up specific
<lightning:button>components to specific action handlers are the red arrows below.- Adding
{!c.handleClick}to theonclickof a<lightning:button>component wires it to the specific action handler. - Calling
component.set("v.message", newMessage)wires up the result of that action handler to the component’smessageattribute.
- Adding
- Function Chaining, Rewiring, and Simple Debugging
- Function Chaining involves collapsing code into fewer lines - the following are all equivalent
- Note the comma in between the different variations
- Function Chaining involves collapsing code into fewer lines - the following are all equivalent
handleClick: function(component, event, helper) {
    let btnClicked = event.getSource();
    let btnMessage = btnClicked.get("v.label");
    component.set("v.message", btnMessage);
},
handleClick2: function(component, event, helper) {
    let newMessage = event.getSource().get("v.label");
    component.set("v.message", newMessage);
},
handleClick3: function(component, event, helper) {
    component.set("v.message", event.getSource().get("v.label"));
}
- The following prints a message to the JavaScript console every time a button is clicked
- There are more sophisticated ways to debug, but printing to the console is a time-honored debugging technique
- If you want to output an object, wrap it with
JSON.stringify(yourObject)to get more useful details - when you want a quick peek,console.log()is your friend
harnessApp.app
<aura:application >
	<c:helloMessageInteractive/>
</aura:application>
helloMessageInteractive.cmp
<aura:component>
    <aura:attribute name="message" type="String"/>
    <p>Message of the day: {!v.message}</p>
    <div>
        <lightning:button label="You look nice today."
            onclick="{!c.handleClick}"/>
        <lightning:button label="Today is going to be a great day!"
            onclick="{!c.handleClick}"/>
    </div>
</aura:component>
helloMessageInteractiveController.js
handleClick2: function(component, event, helper) {
    let newMessage = event.getSource().get("v.label");
    console.log("handleClick2: Message: " + newMessage); // Prints to the JavaScript console
    component.set("v.message", newMessage);
}
harnessApp.app
<aura:application >
	<c:campingListItem/>
</aura:application>
campingListItem.cmp
<aura:component >
	<aura:attribute name="item"
                    type="Camping_Item__c"
                    required="True"
                    default="{Name:'Testing', Price__c:100, Quantity__c:1, Packed__c:false}"/>
    <aura:attribute name="disabled"
                    type="Boolean"
                    default="false"/>
    <p>{!v.item.Name}</p>
    <p><lightning:formattedNumber value="{!v.item.Price__c }" style="currency"/></p>
    <p><lightning:formattedNumber value="{!v.item.Quantity__c }"/></p>
    <p><lightning:input type="toggle"
                        label="Packed?"
                        name="Packed"
                        checked="{!v.item.Packed__c}" /></p>
    <div>
        <lightning:button label="Packed!"
                          onclick="{!c.packItem}"
                          disabled="{!v.disabled}"/>
    </div>
</aura:component>
campingListItemController.js
packItem: function(component, event, helper) {
    let item = component.get("v.item");
    item.Packed__c = true;
    component.set("v.item", item);
    component.set("v.disabled", true);
Input Data Using Forms
Create a form to display current values and accept new user input. Read values from form elements. Validate user input and display error messages for invalid input. Refactor code from a component’s controller to its helper.- Building the Expenses Tracker Mini-App (with SLDS)
- This unit focuses on creating and assembling the expenses tracker mini-app
- This unit focuses on creating and assembling the expenses tracker mini-app
- The expenses App Container
- Going forward, this will use the Salesforce Lightning Design System or SLDS, instead of plain, ugly, components, but SLDS isn’t discussed here. Resources for learning more about SLDS:
- SLDS is automatically available to your components when they run inside Lightning Experience or the Salesforce app - called running in the “one.app container”
- This is the same that’s used by many of the standard Lightning components
- SLDS is not available by default in stand-alone apps, or when you use your components in Lightning Out or Lightning Components in Visualforce
- These others are different app containers, that provide different services and resources
- To create the app such that it works in all these contexts, need to add SLDS to our harness application. Then, lower level components can use SLDS tools and techniques.
extends="force:slds"activates SLDS in the app including the same Lightning Design System styles provided by Lightning- When the component/app runs in Lightning Experience, they use that container’s automatic inclusion of SLDS
expensesApp.app:
<aura:application extends="force:slds">
        <!-- This component is the real "app" -->
        <!-- c:expenses/ -->
</aura:application>
- The expenses App Component
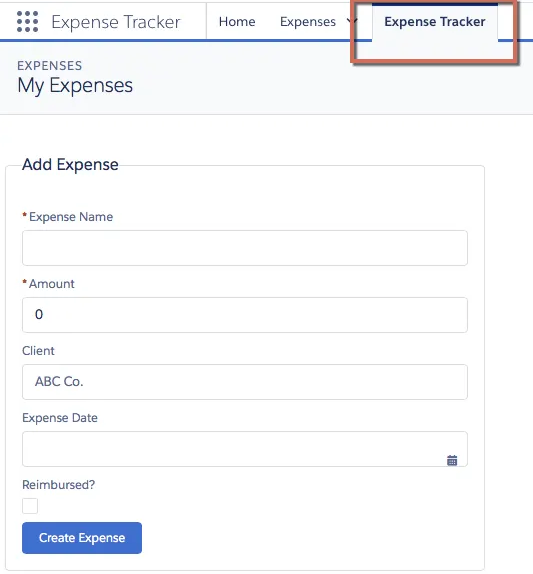
- The code to create the header shown below
expenses.cmp:
<aura:component>
    <!-- PAGE HEADER -->
    <lightning:layout class="slds-page-header slds-page-header_object-home">
        <lightning:layoutItem>
            <lightning:icon iconName="standard:scan_card" alternativeText="My Expenses"/>
        </lightning:layoutItem>
        <lightning:layoutItem padding="horizontal-small">
            <div class="page-section page-header">
                <h1 class="slds-text-heading_label">Expenses</h1>
                <h2 class="slds-text-heading_medium">My Expenses</h2>
            </div>
        </lightning:layoutItem>
    </lightning:layout>
    <!-- / PAGE HEADER -->
    <!-- NEW EXPENSE FORM -->
    <lightning:layout>
        <lightning:layoutItem padding="around-small" size="6">
        <!-- [[ expense form goes here ]] -->
        </lightning:layoutItem>
    </lightning:layout>
    <!-- / NEW EXPENSE FORM -->
</aura:component>

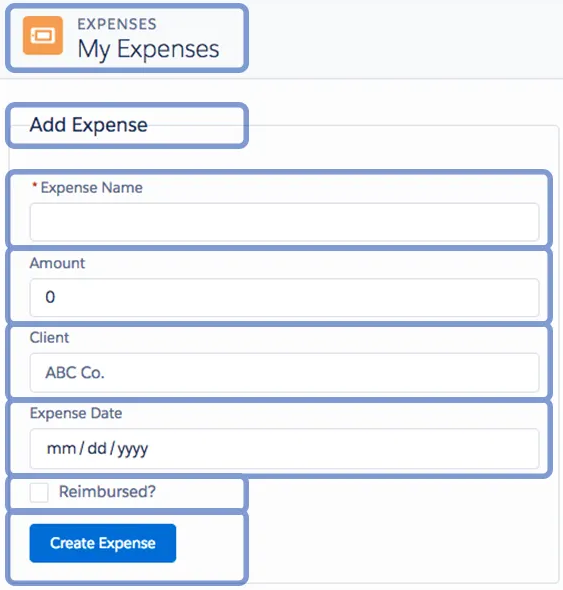
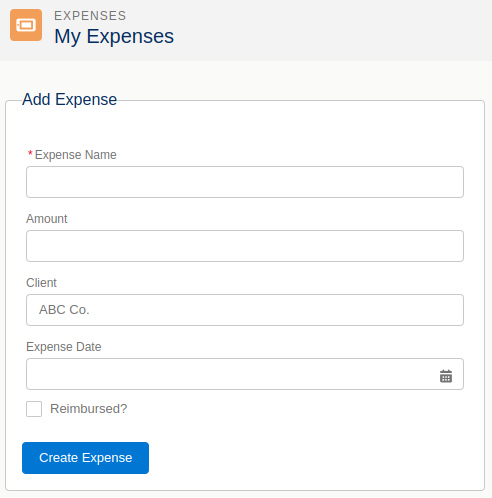
- The New Expense Form
- As a general rule, build these pages by building inside one component until it gets too “busy,” then refactor and decompose into smaller sub-components - the following has not been “decomposed” like that, yet
- New code is added where
<!-- [[ expense form goes here ]] -->was, in the previous code snippet - the result follows the snippet<lightning:input>s can have different data types, ex:type="date"- Other attributes are similar to HTML counterparts:
required,placeholder,type, etc aura:idattribute sets a (locally) unique ID on each tag it’s added to, which is how you read values out of the form fields
<aura:component>
  <!-- PAGE HEADER -->
  <lightning:layout class="slds-page-header slds-page-header_object-home">
    <lightning:layoutItem>
      <lightning:icon
        iconName="standard:scan_card"
        alternativeText="My Expenses"
      />
    </lightning:layoutItem>
    <lightning:layoutItem padding="horizontal-small">
      <div class="page-section page-header">
        <h1 class="slds-text-heading_label">Expenses</h1>
        <h2 class="slds-text-heading_medium">My Expenses</h2>
      </div>
    </lightning:layoutItem>
  </lightning:layout>
  <!-- / PAGE HEADER -->
  <!-- NEW EXPENSE FORM -->
  <lightning:layout>
    <lightning:layoutItem padding="around-small" size="6">
      <!-- CREATE NEW EXPENSE -->
      <div aria-labelledby="newexpenseform">
        <!-- BOXED AREA -->
        <fieldset class="slds-box slds-theme_default slds-container_small">
          <legend
            id="newexpenseform"
            class="slds-text-heading_small
        slds-p-vertical_medium"
          >
            Add Expense
          </legend>
          <!-- CREATE NEW EXPENSE FORM -->
          <form class="slds-form_stacked">
            <lightning:input
              aura:id="expenseform"
              label="Expense Name"
              name="expensename"
              value="{!v.newExpense.Name}"
              required="true"
            />
            <lightning:input
              type="number"
              aura:id="expenseform"
              label="Amount"
              name="expenseamount"
              min="0.1"
              formatter="currency"
              step="0.01"
              value="{!v.newExpense.Amount__c}"
              messageWhenRangeUnderflow="Enter an amount that's at least $0.10."
            />
            <lightning:input
              aura:id="expenseform"
              label="Client"
              name="expenseclient"
              value="{!v.newExpense.Client__c}"
              placeholder="ABC Co."
            />
            <lightning:input
              type="date"
              aura:id="expenseform"
              label="Expense Date"
              name="expensedate"
              value="{!v.newExpense.Date__c}"
            />
            <lightning:input
              type="checkbox"
              aura:id="expenseform"
              label="Reimbursed?"
              name="expreimbursed"
              checked="{!v.newExpense.Reimbursed__c}"
            />
            <lightning:button
              label="Create Expense"
              class="slds-m-top_medium"
              variant="brand"
              onclick="{!c.clickCreate}"
            />
          </form>
          <!-- / CREATE NEW EXPENSE FORM -->
        </fieldset>
        <!-- / BOXED AREA -->
      </div>
      <!-- / CREATE NEW EXPENSE -->
    </lightning:layoutItem>
  </lightning:layout>
  <!-- / NEW EXPENSE FORM -->
</aura:component>
- Attributes for Salesforce Objects (sObjects)
- The
valueattribute on each<lightning:input>sets the content of each field to an expression, for example,{!v.newExpense.Amount__c} - The following is a JSON representation of an sObject, specifying the type of the object and the values for each of the fields to set on it.
- From here on out, Lightning Components framework lets you treat
newExpenselike it’s a record from Salesforce, even though it hasn’t been loaded into Salesforce - This should be added to the top of the component, after the opening
<aura:component>tag:
- The
<aura:component>
    <aura:attribute name="newExpense" type="Expense__c"
                    default="{ 'sobjectType': 'Expense__c',
                             'Name': '',
                             'Amount__c': 0,
                             'Client__c': '',
                             'Date__c': '',
                             'Reimbursed__c': false }"/>
  <!-- PAGE HEADER -->
  <!-- ... -->
- Handle Form Submission in an Action Handler
- Until a controller is added, the “Create Expense” button will generate an error
- Create the controller by clicking the “CONTROLLER” button for the
expensescomponent, then write code similar to the following - Three sections or steps to a controller. These steps are a pretty fundamental way to process user input in a web application.
- Setup
- Process form values
- If there are no errors, do something
- See the Handle Form Submission in an Action Handler section of this page of the module for details of the JavaScript below
expensesController.js:
({
    clickCreate: function(component, event, helper) {
        let validExpense = component.find('expenseform').reduce(function (validSoFar, inputCmp) {
            // Displays error messages for invalid fields
            inputCmp.showHelpMessageIfInvalid();
            return validSoFar && inputCmp.get('v.validity').valid;
        }, true);
        // If we pass error checking, do some real work
        if(validExpense){
            // Create the new expense
            let newExpense = component.get("v.newExpense");
            console.log("Create expense: " + JSON.stringify(newExpense));
            helper.createExpense(component, newExpense);
        }
    }
})
- Create the New Expense
- The JavaScript below avoids the complexity of really creating the record - that step is discussed in more detail in the following unit.
- First, create a place to “store” new expenses - an array of local-only expenses - the line below is added at the top of
expenses.cmp - In the controller, the work of creating the new expenses is hidden behind this function call:
helper.createExpenses(component, newExpense) - HELPERS:
- A component’s helper is the appropriate place to put code shared between several different action handlers
- A component’s helper is a great place to put complex processing details, so logic of your action handlers remain clear and streamlined
- Helper functions can have any function signature - they’re not constrained in the way action handlers in the controller are, since they are called from your code and not from the framework runtime
- Convention is to put the component as the first parameter to helper functions
- To add a helper, click the “HELPER” button for the
expensescomponent
<aura:attribute name="expenses" type="Expense__c[]"/>
expenses.cmp:
<aura:component>
    <aura:attribute name="expenses" type="Expense__c[]"/>
    <aura:attribute name="newExpense" type="Expense__c"
                    default="{ 'sobjectType': 'Expense__c',
                             'Name': '',
                             'Amount__c': 0,
                             'Client__c': '',
                             'Date__c': '',
                             'Reimbursed__c': false }"/>
  <!-- PAGE HEADER -->
  <lightning:layout class="slds-page-header slds-page-header_object-home">
    <lightning:layoutItem>
      <lightning:icons>
  <!-- ... -->
expensesHelper.js:
({
    createExpense: function(component, expense) {
        let theExpenses = component.get("v.expenses");
        // Copy the expense to a new object
        // THIS IS A DISGUSTING, TEMPORARY HACK
        let newExpense = JSON.parse(JSON.stringify(expense));
        theExpenses.push(newExpense);
        component.set("v.expenses", theExpenses);
    }
})
- The Reference is Not the Collection
- See the The Reference Is Not the Collection section of this page of the module for details of the JavaScript below, and answer to the question “Why do I need the
set()here?”
- See the The Reference Is Not the Collection section of this page of the module for details of the JavaScript below, and answer to the question “Why do I need the
console.log("Expenses before 'create': " + JSON.stringify(theExpenses));
theExpenses.push(newExpense);
component.set("v.expenses", theExpenses);
console.log("Expenses after 'create': " + JSON.stringify(theExpenses));
- Displaying the List of Expenses
- Using code snippets below:
- Create a new Aura component named
expenseItem - Add style to the
expenseItemcomponent by clicking “STYLE” to createexpenseItem.css - Add an
expenseItemController.jsby clicking “CONTROLLER” - Add a new
expensesListcomponent containing the expense items
- Create a new Aura component named
- Add the
expensesListcomponent toexpenses.cmpat the bottom of the markup, as shown below
- Using code snippets below:
expenseItem.cmp:
<aura:component>
<aura:handler name="init" value="{!this}" action="{!c.doInit}"/>
<aura:attribute name="formatdate" type="Date"/>
<aura:attribute name="expense" type="Expense__c"/>
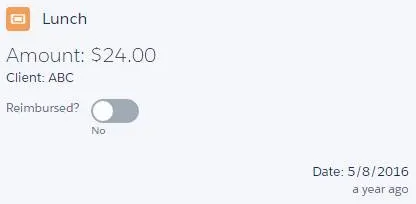
<lightning:card title="{!v.expense.Name}" iconName="standard:scan_card"
class="{!v.expense.Reimbursed__c ?
'slds-theme_success' : ''}">
<aura:set attribute="footer">
<p>Date: <lightning:formattedDateTime value="{!v.formatdate}"/></p>
<p class="slds-text-title"><lightning:relativeDateTime value="{!v.formatdate}"/></p>
</aura:set>
<p class="slds-text-heading_medium slds-p-horizontal_small">
Amount: <lightning:formattedNumber value="{!v.expense.Amount__c}" style="currency"/>
</p>
<p class="slds-p-horizontal_small">
Client: {!v.expense.Client__c}
</p>
<p>
<lightning:input type="toggle"
label="Reimbursed?"
name="reimbursed"
class="slds-p-around_small"
checked="{!v.expense.Reimbursed__c}"
messageToggleActive="Yes"
messageToggleInactive="No"
onchange="{!c.clickReimbursed}"/>
</p>
</lightning:card>
</aura:component>
expenseItem.css:
.THIS.slds-card.slds-theme_success {
    background-color: rgb(75, 202, 129);
}
expenseItemController.js
({
    doInit : function(component, event, helper) {
        let mydate = component.get("v.expense.Date__c");
        if(mydate){
            component.set("v.formatdate", new Date(mydate));
        }
    },
})
expensesList.cmp
<aura:component>
    <aura:attribute name="expenses" type="Expense__c[]"/>
    <lightning:card title="Expenses">
        <p class="slds-p-horizontal_small">
            <aura:iteration items="{!v.expenses}" var="expense">
                <c:expenseItem expense="{!expense}"/>
            </aura:iteration>
        </p>
    </lightning:card>
</aura:component>
expenses.cmp
        <!-- / BOXED AREA -->
      </div>
      <!-- / CREATE NEW EXPENSE -->
    </lightning:layoutItem>
  </lightning:layout>
  <!-- / NEW EXPENSE FORM -->
  <c:expensesList expenses="{!v.expenses}"/>
</aura:component>
- The new components above add a series of cards with expense records on the original Aura component:
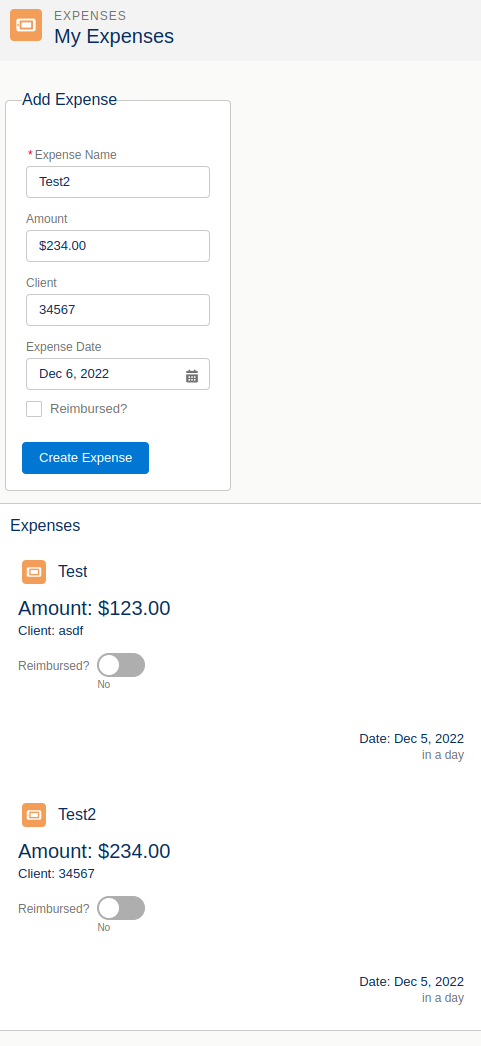
Before updates:

After updates:
harnessApp.app (before):
<aura:application>
    <c:camping/>
</aura:application>
harnessApp.app (after):
<aura:application extends="force:slds">
    <c:camping/>
</aura:application>
camping.cmp:
<aura:component>
    <c:campingHeader/>
    <c:campingList/>
</aura:component>
campingHeader.cmp (before):
<aura:component>
    <h1>Camping List</h1>
</aura:component>
campingHeader.cmp (after):
<aura:component >
    <lightning:layout class="slds-page-header slds-page-header--object-home">
        <lightning:layoutItem >
            <lightning:icon iconName="action:goal" alternativeText="My Camping"/>
        </lightning:layoutItem>
        <lightning:layoutItem padding="horizontal-small">
            <div class="page-section page-header">
                <h1 class="slds-text-heading--label">Camping</h1>
                <h2 class="slds-text-heading--medium">My Camping</h2>
            </div>
        </lightning:layoutItem>
    </lightning:layout>
</aura:component>
campingList.cmp (before):
<aura:component >
    <ol>
    	<li>Bug Spray</li>
        <li>Bear Repellant</li>
        <li>Goat Food</li>
    </ol>
</aura:component>
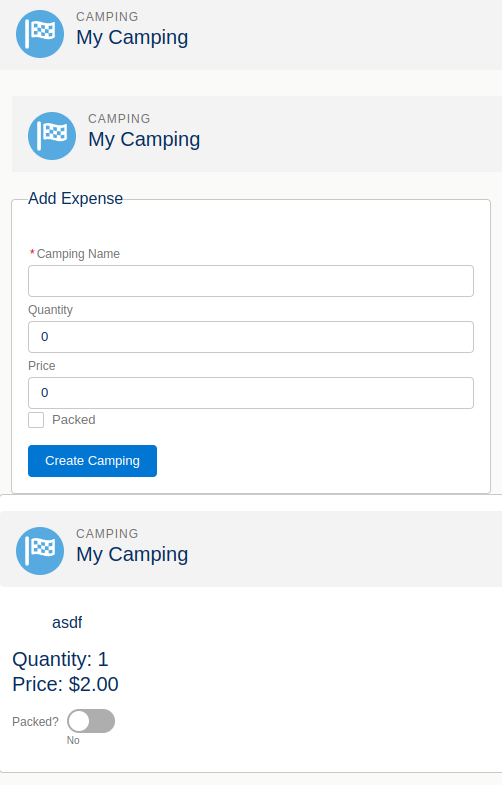
campingList.cmp (after):
<aura:component >
    <aura:attribute name="items" type="Camping_Item__c[]"/>
    <aura:attribute name="newItem" type="Camping_Item__c"
        default="{  'Name':'',
                    'Quantity__c':0,
                    'Price__c':0,
                    'Packed__c':false,
                    'sobjectType':'Camping_Item__c'}"/>

    <!-- NEW Campaing FORM -->
    <div class="slds-col slds-col--padded slds-p-top--large">


        <c:campingHeader/>
        <div aria-labelledby="newCampaingForm">

            <!-- BOXED AREA -->
            <fieldset class="slds-box slds-theme--default slds-container--small">

                <legend id="newCampaingForm" class="slds-text-heading--small
                                                    slds-p-vertical--medium">
                    Add Expense
                </legend>

                <!-- CREATE NEW Campaing FORM -->
                <form class="slds-form--stacked">

                    <!-- For Name Field -->
                    <lightning:input aura:id="expenseform" label="Camping Name"
                                     name="expensename"
                                     value="{!v.newItem.Name}"
                                     required="true"/>
                    <!-- For Quantity Field -->
                    <lightning:input type="number" aura:id="campingform" label="Quantity"
                                     name="expenseamount"
                                     min="1"
                                     value="{!v.newItem.Quantity__c}"
                                     messageWhenRangeUnderflow="Enter minimum 1 Quantity"/>
                    <!-- For Price Field -->
                    <lightning:input aura:id="campingform" label="Price"
                                     formatter="currency"
                                     name="expenseclient"
                                     value="{!v.newItem.Price__c}"
                                     />
                    <!-- For Check Box -->
                    <lightning:input type="checkbox" aura:id="campingform" label="Packed"
                                     name="expreimbursed"
                                     checked="{!v.newItem.Packed__c}"/>

                    <lightning:button label="Create Camping"
                                      class="slds-m-top--medium"
                                      variant="brand"
                                      onclick="{!c.clickCreateItem}"/>
                </form>
                <!-- / CREATE NEW EXPENSE FORM --></fieldset>
            <!-- / BOXED AREA -->

        </div>
        <!-- / CREATE NEW EXPENSE -->
    </div>
    <!-- ITERATIING ITEM LISTS -->
    <div class="slds-card slds-p-top--medium">

        <c:campingHeader/>

        <section class="slds-card__body">
            <div id="list" class="row">
                <aura:iteration items="{!v.items}" var="item">
                    <c:campingListItem item="{!item}"/>
                </aura:iteration>
            </div>
        </section>
    </div>
    <!-- / ITERATIING ITEM LISTS -->
</aura:component>
campingListController.js (new):
({
    clickCreateItem : function(component, event, helper) {
        var validCamping = component.find('campingform').reduce(function (validSoFar, inputCmp) {
            // Displays error messages for invalid fields
            inputCmp.showHelpMessageIfInvalid();
            return validSoFar && inputCmp.get('v.validity').valid;
        }, true);

        if(validCamping){
            var newCampingItem = component.get("v.newItem");
            //helper.createCamping(component,newCampingItem);
            var campings = component.get("v.items");
            var item = JSON.parse(JSON.stringify(newCampingItem));

            campings.push(item);

            component.set("v.items",campings);
            component.set("v.newItem",{ 'sobjectType': 'Camping_Item__c',
                                        'Name': '',
                                        'Quantity__c': 0,
                                        'Price__c': 0,
                                        'Packed__c': false });
        }
    }
})
Connect to Salesforce with Server-Side Controllers
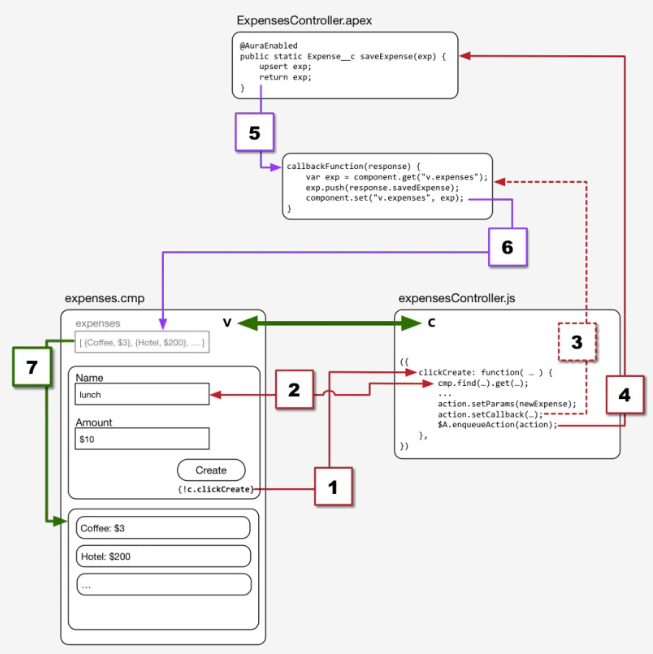
Create Apex methods that can be called remotely from Aura component code. Make calls from Aura components to remote methods. Handle server responses asynchronously using callback functions. Stretch goal: explain the difference between “c.”, “c:”, and “c.”.- Server-Side Controller Concepts
- Up until now, this module has focused on client-side code - this section introduces server-side Apex, which is what’s needed to actually write records to the database
- The following shows the steps until now:
- When action handler is called, it gets values out of the form fields
- Adds a new expense to the
expensesarray - When array is updated via
set, it triggers the rerendering of the list of expenses - Completing the circuit
- Adding control flow results in the more complex system below
- Server calls take time and are therefore handled asynchronously, so the button fires off a server request and then keeps processing
- When the response comes back from the server, code that was packaged with the request, called a callback function runs and handles the response, updating client-side data and UI
- Querying for Data from Salesforce
- Create an Apex controller - Apex controllers contain remote methods your Lightning components can call. In this case to query for and receive expenses data from Salesforce. Note:
@AuraEnabledannotation before the method declarationstatickeyword: all@AuraEnabledcontroller methods must be static methods and either public or global scope
public with sharing class ExpensesController {
    // STERN LECTURE ABOUT WHAT'S MISSING HERE COMING SOON
    @AuraEnabled
    public static List<Expense__c> getExpenses() {
        return [SELECT Id, Name, Amount__c, Client__c, Date__c,
                       Reimbursed__c, CreatedDate
                FROM Expense__c];
    }
}
- Loading Data from Salesforce
- Next step is to wire up
expensescomponent to the server-side Apex controller - do this by changing the opening<aura:component>tag of expenses to point at the Apex controller:- When the expenses component is loaded,
- Query Salesforce for existing records, and
- Add those records to the expenses component attribute
- Next step is to wire up
<aura:component controller="ExpensesController">
- The
<aura:handler>tag specifies that a component can handle a specific event- The following line is added to the
expensescomponent, right below the component’s attribute definitions
- The following line is added to the
<aura:handler name="init" action="{!c.doInit}" value="{!this}"/>
expenses.cmp:
<aura:component controller="ExpensesController">
    <aura:attribute name="expenses" type="Expense__c[]"/>
    <aura:attribute name="newExpense" type="Expense__c"
                    default="{ 'sobjectType': 'Expense__c',
                             'Name': '',
                             'Amount__c': 0,
                             'Client__c': '',
                             'Date__c': '',
                             'Reimbursed__c': false }"/>
    <aura:handler name="init" action="{!c.doInit}" value="{!this}"/>
  <!-- PAGE HEADER -->
// ...
- Calling Server-Side Controller Methods
- Add the following to the expense component’s (JavaScript) controller
// Load expenses from Salesforce
doInit: function(component, event, helper) {
    // Create the action
    let action = component.get("c.getExpenses");
    // Add callback behavior for when response is received
    action.setCallback(this, function(response) {
        let state = response.getState();
        if (state === "SUCCESS") {
            component.set("v.expenses", response.getReturnValue());
        }
        else {
            console.log("Failed with state: " + state);
        }
    });
    // Send action off to be executed
    $A.enqueueAction(action);
},
- Server Calls, Asynchronous Execution, and Callback Functions
- Reference Calling Server-Side Controller Methods and Server Calls, Asynchronous Execution, and Callback Functions sections of this unit for the details of the JavaScript in the last section
- Handling the Server Response
- Reference Handling the Server Response section of this unit
- Apex Controllers for Aura Components
- Reference Apex Controllers for Aura Components section of this unit for details on this code
public with sharing class ExpensesController {
    @AuraEnabled
    public static List<Expense__c> getExpenses() {
        // Perform isAccessible() checking first, then
        return [SELECT Id, Name, Amount__c, Client__c, Date__c,
                       Reimbursed__c, CreatedDate
                FROM Expense__c];
    }
    @AuraEnabled
    public static Expense__c saveExpense(Expense__c expense) {
        // Perform isUpdateable() checking first, then
        upsert expense;
        return expense;
    }
}
- Note that you need to implement object- and field-level security yourself, for example:
@AuraEnabled
public static List<Expense__c> getExpenses() {
    // Check to make sure all fields are accessible to this user
    String[] fieldsToCheck = new String[] {
        'Id', 'Name', 'Amount__c', 'Client__c', 'Date__c',
        'Reimbursed__c', 'CreatedDate'
    };
    Map<String,Schema.SObjectField> fieldDescribeTokens =
        Schema.SObjectType.Expense__c.fields.getMap();
    for(String field : fieldsToCheck) {
        if( ! fieldDescribeTokens.get(field).getDescribe().isAccessible()) {
            throw new System.NoAccessException();
        }
    }
    // OK, they're cool, let 'em through
    return [SELECT Id, Name, Amount__c, Client__c, Date__c,
                    Reimbursed__c, CreatedDate
            FROM Expense__c];
}
- Saving Data to Salesforce
- Reference Saving Data to Salesforce for details on this code
expensesHelper.js:
({
    createExpense: function(component, expense) {
        let action = component.get("c.saveExpense");
        action.setParams({
            "expense": expense
        });
        action.setCallback(this, function(response){
            let state = response.getState();
            if (state === "SUCCESS") {
                let expenses = component.get("v.expenses");
                expenses.push(response.getReturnValue());
                component.set("v.expenses", expenses);
            }
        });
        $A.enqueueAction(action);
    },
})
- Things to Watch Out For
- Case Sensitivity: Apex is case-insensitive, but JavaScript is case-sensitive
- Best practice: Always use the exact API name of every object, field, type, class, method, entity, etc
required = True, in the JavaScript above, is enforced at the UI level only. A better solution may be to enforce it at the object/field level.
- Case Sensitivity: Apex is case-insensitive, but JavaScript is case-sensitive
Apex Controller, CampingListController.apxc:
public class CampingListController {
    @auraenabled
    public static List<Camping_Item__c> getItems (){
        List<Camping_Item__c> CI = [select id,
                                           name,
                                           price__c,
                                           Quantity__c,
                                           Packed__c
                                      from Camping_Item__c ];
        return CI;
    }
    @auraenabled
    public static Camping_Item__c saveItem (Camping_Item__c item){
        insert item;
        return item;
    }
}
campingList.cmp:
<aura:component controller="CampingListController">
    <aura:handler name="init" value="{!this}" action="{!c.doInit}"/>
	<aura:attribute name="items" type="Camping_Item__c[]"/>
    <aura:attribute name="er" type="boolean" default="false"/>
    <aura:attribute name="newItem" type="Camping_Item__c"
                    default="{ 'sobjectType': 'Camping_Item__c',
                         'Name': '',
                         'Price__c': 0,
                         'Quantity__c': 0,
                         'Packed__c': false
                       }"/>
    <ui:inputText value="{!v.newItem.Name}" aura:id="name" label="name"/>
    <ui:inputCheckbox value="{!v.newItem.Packed__c}" aura:id="Packed" label="Packed"/>
    <ui:inputCurrency value="{!v.newItem.Price__c}"  aura:id="Price" label="Price"/>
    <ui:inputNumber value="{!v.newItem.Quantity__c}" aura:id="Quantity" label="Quantity"/>
    <ui:button label="Create Camping" press="{!c.createItem}" aura:id="button"/>
    <br/>
	<aura:iteration items="{!v.items}" var="PerItem">

        <c:campingListItem item="{!PerItem}" />
    </aura:iteration>
</aura:component>
campingListController.js:
({
    doInit  : function(component, event, helper) {
        var action = component.get("c.getItems");
        action.setCallback(this, function(response){
            var state = response.getState();
            if (component.isValid() && state === "SUCCESS") {
                component.set("v.items", response.getReturnValue());
            }
        });
        $A.enqueueAction(action);
    },

    createItem : function(component, event, helper) {
        helper.validateFields (component,component.find("name"));
        helper.validateFields (component,component.find("Price"));
        helper.validateFields (component,component.find("Quantity"));
        if(component.get("v.er") === false)
        {
            var Item = component.get("v.newItem");
            helper.createItem (component,Item);
        }
    }
})
campingListHelper.js
({
    validateFields : function (component,field) {

        var nameField = field;
        console.log('yes:'+nameField);
        var expname = nameField.get("v.value");
        if ($A.util.isEmpty(expname)){
           component.set("v.er",true);
           nameField.set("v.errors", [{message:"this field can't be blank."}]);
        }
        else {
            nameField.set("v.errors", null);
        }
    },

    createItem : function (component,Item){
        var action = component.get("c.saveItem");
        action.setParams({"item":Item});
        action.setCallback(this,function(response){
            var state = response.getState();
            if (component.isValid() && state === "SUCCESS") {
                var campings = component.get("v.items");
                campings.push(response.getReturnValue());
                component.set("v.items", campings);
            }
        });
       $A.enqueueAction(action);
    }
})
Connect Components with Events
Define custom events for your apps. Create and fire events from a component controller. Create action handlers to catch and handle events that other components send. Refactor a big component into smaller components.- Connect Components with Events
- Composition and Decomposition
- The Wiring-a-Circuit Metaphor, Yet Again
- Sending an Event from a Component
- Defining an Event
- Sending an Event
- Handling an Event
- Refactor the Helper Functions
- Refactor the Add Expense Form
- Bonus Lesson-Minor Visual Improvements
Discover Next Steps
List five aspects of Aura components that you can explore in more depth. Plan three improvements you could make to the Expenses app. Earn. This. Badge!- Congratulations!
- What We Skimmed Over or Zipped Past
- What We Didn’t Cover At All
- Exercises for the Adventurous