App Development with Salesforce DX
These are technical notes I compiled while studying using Trailhead, Salesforce's free self-learning portal.
Set Up Salesforce DX
Describe how the model for traditional org development differs from modular package development. Describe the key characteristics of a package.- Get Started with Source-Driven Development
- Salesforce DX:
- Streamlines the development life cycle, improves team development and collaboration, facilitates automated testing/continuous integration, makes the release cycle more efficient and agile
- Provides an alternative to change set development and shifts the source of truth from the org to your version control system (VCS)
- Shifts development focus from org development to package development
- Salesforce DX:
- What’s a Scratch Org?
- Scratch orgs are dedicated, configurable, short-term Salesforce environments
- Use them to:
- Start a new project/feature branch
- Test a new feature
- Start automated testing
- Perform development tasks directly in an org
- Start from “scratch” with a fresh new org
- Use them to:
- Scratch Org configuration files let you configure the org with different Salesforce editions and just the features/settings you want.
- Can be shared with other team members so you all have the same basic org to develop in.
- Scratch orgs are dedicated, configurable, short-term Salesforce environments
- Scratch Orgs do Not Replace Sandboxes
- Sandboxes are ephemeral in nature (30-day max lifespan), so ideal for developing a new feature/customization/package
- Great for unit testing and continuous integration
- Sandboxes contain all the metadata of your production org and are still necessary for final user-acceptance testing, continuous delivery, and staging
- A Dev Hub provides you and your team with ability to create/manage scratch orgs.
- Dev Hubs can be enabled in any paid org, but its always best to practice somewhere other than production.
- Some Salesforce CLI commands:
sfdx update: Output likesfdx-cli: Updating CLI...means thatsfdxis installedsfdx force --help: All available topics in theforcenamespacesfdx commands: All available commands
- Log In to the Dev Hub
- To start, log in to the Dev Hub using the CLI so you’re authorized to creaate scraatch orgs.
- Use
sfdx auth:web:loginto log in.- Use
-hor--helpflags to get more information - Use
-dflag to set this org as the default Dev Hub - only use for your Dev Hub - Use
-aflag to set an alias for the org (like DevHub)
- Use
- Ex:
sfdx auth:web:login -r https://test.salesforce.com -a FullSandbox
- Use
- To start, log in to the Dev Hub using the CLI so you’re authorized to creaate scraatch orgs.
- The Power of Aliasing
- Best practice is to leverage aliases to manage and track orgs
- A scratch org looks like
[email protected]
- A scratch org looks like
sfdx force:org:open -u FullSandboxsfdx force:org:open -u MyScratchOrgsfdx force:limits:api:display -u DevSandbox
- Best practice is to leverage aliases to manage and track orgs
- View All Orgs with
sfdx force:org:list- View more info with
--verbose
- View more info with
- Use Dev Hub to:
- Create and manage your scratch orgs
- How do you list all available CLI commands:
sfdx commands
Get Ready to Create an App
Explain the Salesforce DX project structure. Describe how to use Salesforce CLI to create a project. Describe how to use Salesforce CLI to import sample data.- Create a Salesforce DX Project
- A Salesforce DX project is a local copy of your package metadata.
- Group of related code and customizations.
- Also contains the core assets required to synchronize local project source and metadata with your scratch orgs.
- Note: as of Spring, 2019 release (API version 45), you can build Lightning components using two programming models:
- Lightning Web Components
- Aura Components
- To create the new project:
sfdx force:project:create -n geolocation- Creates a folder called geolocation and scaffolds a new project with all assets in the proper folder structure.
- sfdx-project.json
- Indicates that the directory is a Salesforce DX project.
- Contains project information and facilitates the authentication of scratch orgs.
- Tells Salesforce CLI where to put files when syncing between project and scratch org. Specifies:
- Paths to source code, classes, metadata as located in package directories (force-app, in this case)
- Namespace, if needed
- API version of your source
- config/project-scratch-def.json
- Determines configuration of a scratch org, including which features and settings define its org shape
- This config file can be shared by a whole dev team.
- force-app
- Folder that contains the source for the project.
- sfdx-project.json
- Creates a folder called geolocation and scaffolds a new project with all assets in the proper folder structure.
- A Salesforce DX project is a local copy of your package metadata.
- Configure a Scratch Org Definition File
- Scratch org definition files allow you to easily create scratch orgs with different features or preferences for testing.
- Ex:
s1EncryptedStoragePref2lets you turn Lightning Experience caching on or off.
- Ex:
- Example replacement contents for
config/project-scratch-def.json:
- Scratch org definition files allow you to easily create scratch orgs with different features or preferences for testing.
{
  "orgName": "Account Geolocation App",
  "edition": "Developer",
  "settings": {
    "mobileSettings": {
      "enableS1EncryptedStoragePref2": false
    }
  }
}
- Create a Scratch Org
- Create a scratch org with alias
GeoAppScratch- Navigate to geolocation folder
sfdx force:org:create -s -f config/project-scratch-def.json -a GeoAppScratch-soption indicates you want this scratch org to be default org for this project when running Salesforce CLI commands.-foption is the path to the project scratch org configuration file-alets you refer to the org using its alias, GeoAppScratch
- Create a scratch org with alias
- Create Sample Data
- Scratch orgs come with some standard data based on edition. But, often its helpful to add sample data that’s more relevant to the app or package you’re building. Examples:
sfdx force:data:record:create -s Account -v "Name='Marriott Marquis' BillingStreet='780 Mission St' BillingCity='San Francisco' BillingState='CA' BillingPostalCode='94103' Phone='(415) 896-1600' Website='www.marriott.com'"sfdx force:data:record:create -s Account -v "Name='Hilton Union Square' BillingStreet='333 O Farrell St' BillingCity='San Francisco' BillingState='CA' BillingPostalCode='94102' Phone='(415) 771-1400' Website='www.hilton.com'"sfdx force:data:record:create -s Account -v "Name='Hyatt' BillingStreet='5 Embarcadero Center' BillingCity='San Francisco' BillingState='CA' BillingPostalCode='94111' Phone='(415) 788-1234' Website='www.hyatt.com'"
- In the project, create a directory called data:
mkdir data
- Export some sample data:
sfdx force:data:tree:export -q "SELECT Name, BillingStreet, BillingCity, BillingState, BillingPostalCode, Phone, Website FROM Account WHERE BillingStreet != NULL AND BillingCity != NULL and BillingState != NULL" -d ./data
- Following command will import the sample data exported above into the scratch org.
sfdx force:data:tree:import --sobjecttreefiles data/Account.json
- Note: Best practice is to exclude
.sfdxfolders from being added to the repository. This folder holds temporary info for your scratch orgs, so you don’t have to save it for posterity. In Git, you would add it to the.gitignorefile.
- Scratch orgs come with some standard data based on edition. But, often its helpful to add sample data that’s more relevant to the app or package you’re building. Examples:
- What info does the sfdx-project.json file contain?
- Info required to track source and metadata with your scratch org
- What is the CLI command to create a project called MyNewApp?
sfdx force:project:create -n MyNewApp
- What’s an example of the CLI command to import existing Accounts sample data in a different project?
sfdx force:data:tree:import --sobjecttreefiles data/Account.json
Build the Geolocation App Using Salesforce CLI
Describe how you use the CLI to create an Apex class. Describe how you use the CLI command to create an Aura component.- This section reuses code from a Trailhead project: Develop an Account Geolocation App with Aura Components.
- Code for the various sections included here
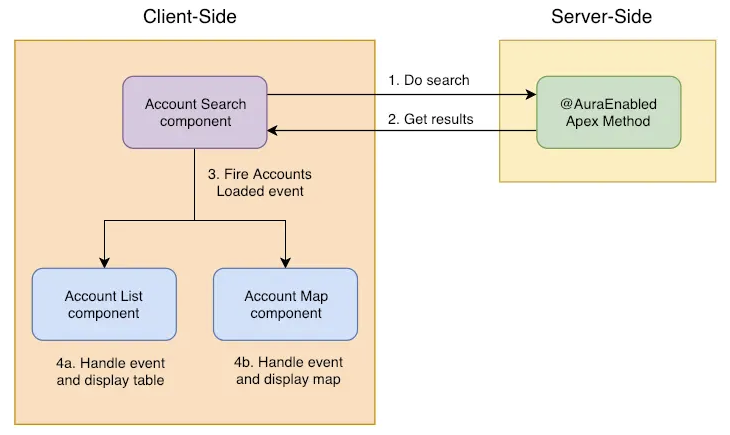
- Design of the component interactions:
- Account Search component calls a server-side action to search for accounts.
- Apex method returns the SOSL search results.
- Account search component fires an event notifying other components of the data.
- Components that handle the event display the data to the user.
- Create the Account Search Apex Controller
- The Apex controller lets your Aura components retrieve a list of accounts with their location information
- Apex classes are stored in a folder called
classesinforce-app/main/default - Steps:
- Scaffold a new Apex class via:
sfdx force:apex:class:create -n AccountSearchController -d force-app/main/default/classes - Update
AccountSearchController.clswith code sourced from here - Push the new code to the scratch org via:
sfdx force:source:push
- Scaffold a new Apex class via:
- Create the Accounts Loaded Aura Event
- Using the “single responsibility design principle,” delegate the display of the search results by firing an event that is handled by the Account Mapp and Account List components created later.
- Steps:
- Create the event in the aura folder via:
sfdx force:lightning:event:create -n AccountsLoaded -d force-app/main/default/aura - Update
AccountsLoaded.evtwith code sourced from here - Push the new code to the scratch org via:
sfdx force:source:push
- Create the event in the aura folder via:
- Create the Account Search Aura Component
- Aura component files are grouped together in bundles, which are stored in folders in side the
force-app/main/default/aurafolder - Steps:
- Create the component via:
sfdx force:lightning:component:create -n AccountSearch -d force-app/main/default/aura - Update
AccountSearch.cmp,AccountSearchController.js, andAccountSearchHelper.jswith code sourced from here
- Create the component via:
- Aura component files are grouped together in bundles, which are stored in folders in side the
- Create the Account List Aura Component
- This Aura component displays accounts in a data table
- To know what data to show, it subscribes to the
c:AccountsLoadedeven created in a previous step - Steps:
- Create the component in the aura folder via:
sfdx force:lightning:component:create -n AccountList -d force-app/main/default/aura - Update
AccountList.cmpandAccountListController.jswith code sourced from here
- Create the component in the aura folder via:
- What’s the CLI command to create a new Apex class called NewClass in the force-app folder?
sfdx force:apex:class:create -n NewClass -d force-app/main/default/classes
- What’s the CLI command to create a new Aura component called ListView in the force-app folder?
sfdx force:lightning:component:create -n ListView -d force-app/main/default/aura
Build the Account Map Display
Describe the Salesforce CLI commands used to sync your project with your scratch orgs. Describe the Salesforce CLI command to create a permission set. Understand how to build an app using Aura components.- This step involves the creation of the final components of the geolocation app, which brings all the features together.
- The Account Locator Aura Component is composed of the other components created throughout this project. Two powerful features of the Lightning component framework:
- Component Encapsulation
- Component Reusability
- Composing fine-grained components in a larger component enables you to build more interesting components and applications.
- The Account Locator Aura Component is composed of the other components created throughout this project. Two powerful features of the Lightning component framework:
- Create the Account Map Aura Component
- This component uses the
<lightning:map>component to display accounts on a map. - The client-side controllers
onAccountsLoadedfunction transforms the event data into the format expected by the<lightning:mapcomponent. - Steps:
- Create the AccountMap component in the aura folder via
sfdx force:lightning:component:create -n AccountMap -d force-app/main/default/aura - Update
AccountMap.cmpandAccountMapController.jswith code sourced from here
- Create the AccountMap component in the aura folder via
- This component uses the
- Create the Account Locator Aura Component
- This is the main component, which is used to display the app to end users in Lightning pages, mobile, and on cusomt tabs.
- Steps:
- Create the AccountLocator component via:
sfdx force:lightning:component:create -n AccountLocator -d force-app/main/default/aura
- Create the AccountLocator component via:
- Create the Account Locator Custom Tab
- Open your scratch org via:
sfdx force:org:open - Create the tab via: Setup > Quick Start > “Tab” > Tabs
- Open your scratch org via:
- Create the Geolocation Permission Set
- Setup > Quick Find > “Permission Sets” > Permission Sets
- Note: User User is the default full name given to the system admin in a scratch org.
- Setup > Quick Find > “Permission Sets” > Permission Sets
- Pull Scratch Org Changes into your Project
- To prevent changes to profiles when pulling metadata from the scratch org back to the local project, add
**/profilesto the.forceignorefile
- To prevent changes to profiles when pulling metadata from the scratch org back to the local project, add
- Sync the changes made in the scratch org with the local file via:
sfdx force:source:pull - Validate the App
- You can use the same scratch org used during development to perform testing, but its recommended that you always start with a fresh scratch org. This sensures you’ve externalized all your source from the org.
- Steps:
- Create new scratch org via:
sfdx force:org:create -f config/project-scratch-def.json -a GeoTestOrg - Push local source and metadata to the scratch org via:
sfdx force:source:push -u GeoTestOrg - Assign your permission set via:
sfdx force:user:permset:assign -n Geolocation -u GeoTestOrg - Load the data exported from a different scratch org previously via:
sfdx force:data:tree:import -f data/Account.json -u GeoTestOrg - Open the org via:
sfdx force:org:open -u GeoTestOrg
- Create new scratch org via:
- What’s the CLI command to sync changes in your local project to a scratch org with alias MyScratchOrg?
sfdx force:source:push -u MyScratchOrg
- What’s the CLI command to assign a permssion set called MyPermSet to provide access to objects in an org with the alias MyTP?
sfdx force:user:permset:assign -n MyPermSet -u MyTP
Convert and Deploy an Existing App
Describe the Salesforce CLI command to set a password on a scratch org. Describe how use the CLI to convert from metadata format in to source format that can be used with a Salesforce DX project. Demonstrate how to use the CLI to deploy metadata to your testing org.- There are many methods to convert an existing app to source format.
- Source format is the decomposed file structure for the Salesforce DX project.
- This section takes advantage of an existing sample app called Mutual Fund Explorer.
- Create a Project and Scratch Org
- Steps:
- Create a new project via:
sfdx force:project:create -n MutualFundExplorer - Change to the
MutualFundExplorerdirectory via:cd MutualFundExplorer - Create a scratch org with alias
TempUnmanagedand set it as default via:sfdx force:org:create -f config/project-scratch-def.json -a TempUnmanaged -s
- Create a new project via:
- Steps:
- Install the Unmanaged Package
- Use Salesforce CLI to install the unmanaged package for the DreamInvest app into the scratch org. Package ID: 04t46000001DnYm
- Steps:
- Install the managed package via:
sfdx force:package:install -p 04t46000001DnYm -w 3-w 3makes the command wait up to 3 minutes and display status messages.
- Open the scratch org via:
sfdx force:org:open
- Install the managed package via:
- Create the Permission Set
- Steps:
- Create Via: Setup > Permission Sets. Add the DreamInvest app.
- Extract the permission set into our source via:
sfdx force:source:pull -u TempUnmanaged
- Steps:
- Extract the Package Source to Your Project
- There are many ways to pull the existing application out of the org:
- Create a
package.xmlfile and pull source using Metadata API retrieve method - If source is already in a VCS, use whatever method you prefer.
- This step demonstrates using CLI commands to retrieve the contents of a package.
- Create a
- Steps:
- Create a directory called
mdapipackagevia:mkdir mdapipackage - Retrieve the contents of the DreamInvest package into the
mdapipackagefolder via:sfdx force:mdapi:retrieve -s -r ./mdapipackage -p DreamInvest -u TempUnmanaged -w 10 - Navigate to the folder
- Unzip
unpackaged - Delete
unpackaged.zip
- Create a directory called
- Following completion of these steps you have source for the app in metadata format.
- There are many ways to pull the existing application out of the org:
- Convert the Source and Push It to a New Scratch Org
- Now, convert metadata format to source format
- Metadata format was never designed for developers to work with, as its stored in one massive file in the production org.
- Source format breaks up the metadata into smaller files.
- Steps:
- From within the
MutualFundExplorerfolder, convert the contents of themdapipackagefolder via:sfdx force:mdapi:convert -r mdapipackage/ - Delete the
mdapipackagefolder - Delete the scratch org via:
sfdx force:org:delete -u TempUnmanaged
- From within the
- Now, convert metadata format to source format
- Verify Your Work
- Easiest way to verify that the previous steps is to spin up a new scratch org and try it out.
- Steps:
- Create a new scratch org via:
sfdx force:org:create -s -f config/project-scratch-def.json - Push local source and metadata to the scratch org via:
sfdx force:source:push - Assign a permission set via:
sfdx force:user:permset:assign -n DreamInvest - Open your org via:
sfdx force:org:open
- Create a new scratch org via:
- At this point, the app has been fully converted. If we were going to continue work on it, we would comment the current source into your VSC and continue development.
- Deploy the Converted App Using Metadata API
- Next steps involve using the Metadata API to deploy the app into an org. From there, can use existing technology (packaging, change sets, Ant Migration tool, Metadata API) to move it into your production environment.
- Register Your Testing Environment
- Steps:
- Log in to the Trailhead Playground org and create an alias via:
sfdx auth:web:login -a MyTP - Confirm that this org is available via:
sfdx force:org:list
- Log in to the Trailhead Playground org and create an alias via:
- Steps:
- Convert Source to Metadata Format and Deploy
- Steps:
- Create a folder to put the converted files into called
mdapioutput:mkdir mdapioutput - Run the convert command via:
sfdx force:source:convert -d mdapioutput/. Following this step, the source is in a format that works with the Metadata API. - Deploy it to the testing environment (new trailhead playground):
sfdx force:mdapi:deploy -d mdapioutput/ -u MyTP -w 100 - Assign a permission set via:
sfdx force:user:permset:assign -n DreamInvest -u MyTP - Open org to run tests and interact with app via:
sfdx force:org:open -u MyTP
- Create a folder to put the converted files into called
- Steps:
- This is a major chunk of the package development life cycle: Creating an app, converting an existing app, and deploying the app to an org. These are the commands that are used most often.