Change Set Development Model
These are technical notes I compiled while studying using Trailhead, Salesforce's free self-learning portal.
Plan for Changes to Your Org
Identify which development environment to use in each ALM step when working in the change set development model. Create a new sandbox. Establish a method for tracking changes made in a release.- Put release plans in writing so there’s less potential for confusion with stakeholders.
- Assignments, test plans, decisions, and milestones are easier to think about in concrete terms than abstract ones.
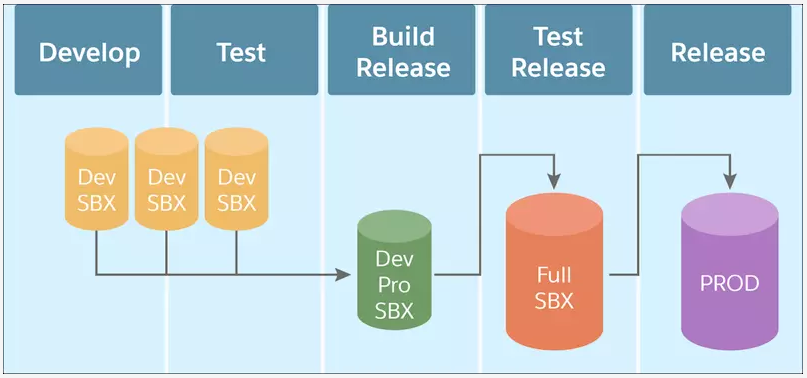
- Steps of the Application Lifecycle Management (ALM) process:
- Plan Release
- Develop
- Test
- Build Release
- Test Release
- Release
- Release participants need to be able to access appropriate environments during each step of the ALM process.
- Develop and Test (Steps 2 and 3): each team member has their own Developer sandbox
- Build Release (Step 4): changes are migrated from Developer sandboxes to a shared Developer Pro sandbox for integration.
- Test Release (step 5): team uses a Full sandbox to create a complete replica of production.
- Release (step 6): use the Full Sandbox to train users without exposting production data. Then, migrate changes to Production.
- Sandboxes are available in Professional, Enterprise, Unlimited, and Performance editions of Salesforce
- Not trailhead orgs
- Access setup > Company Settings > Company Information to vew the org edition
- Important to keep track of all changes made
- Some changes may require manual migration (specifically, any not supported in the Metadata API).
- View a complete report on which components are/are not supported.
- Some changes may require manual migration (specifically, any not supported in the Metadata API).
- Common to use a change-tracking tool for logging each change that developers make. Important to include the following fields:
- Who is assigned to make the change?
- Does this change require manual migration?
- Which component is impacted by this change?
- Which orgs currently have the change?
- When was the change made in each environment?
- The “Setup Audit Trail” captures almost every change made using the Salesforce user interface. Cross-checking the audit trail against the
- Why is it important to track changes made in development?
- To identify what should go in a change set
- What makes a developer sandbox a good choice for development over other types of sandboxes?
- It allows developers to keep release changes isolated
Develop and Test Changes Locally
Create a change set, including any dependencies for your customization. Authorize a deployment connection to another environment. Upload a change set to an org. Describe when it’s necessary to clone a change set.- Documentation on Permission Sets and Profile Settings in Change Sets
- You can’t modify the contents of a change set after it is uploaded to an org
- If you want to modify a change set after upload, clone it, modify the clone, and upload the modified clone to the target org
- Standard way to perform Salesforce development is for each developer to develop in a Developer org. Then, those changes are migrated to a Developer Pro org for integration testing.
- Click view/add dependencies to check whether any of the new components need another component. From Salesforce help:
- A dependency is created when one component needs another component, permission, or preference to be valid. The components in this list have dependencies. Although you don’t have to add dependent components to a change set, you should make sure that they exist in the organizations where the change set will be deployed.
- When initially setting up an org to receive outbound change sets go: Setup > Quick Find > “Deployment” > Deployment Settings > Edit. Then select “Allow Inbound Changes”
- When is it necessary to clone a change set?
- To modify its contents after it has been uploaded to a target org.
- Which step must be performed to transfer a change set from one sandbox to another?
- Authorize a connection in the sandbox accepting the change set.
Test in the Integration Environment and Deploy Changes
Clone a change set. Validate a change set. Deploy a change set.- Developer Pro sandboxes are commonly used to integrate change sets from multiple developers. If mistakes are found in the Developer Pro sandbox following integration:
- Fix the changes in the Developer sandbox that need update
- Create a new change set in that sandbox
- Refresh the Developer Pro sandbox so it matches production
- Set up authorizations between Dev and Dev Pro sandboxes
- Deploy the changes to Dev Pro
- Test the changes
- Steps for final deployment:
- Deploy change set from Dev Pro to a Full sandbox org
- Clone the change set deployed to the Full sandbox
- Upload the change set to production org
- Validate the change set in the production org
- Determine a schedule for deployment production org usage is light
- Validation of a change set is a dry run of the deployment, showing success or failure messages that occur with an actual deployment but not actually deploying
- Validation locks the resources being deployed. You can still read and write data to the org, but you can’t make setup changes that modify the metadata.
- In change set development, the most common cause of errors is dependent components that aren’t included in the change set.
- Why should you validate a change set?
- To perform a change set deployment dry run
- What is a common reason for change set deployment to fail?
- A dependent component was not included in the change set