Virtual Whiteboarding: Quick Look
These are technical notes I compiled while studying using Trailhead, Salesforce's free self-learning portal.
Learn How to Whiteboard During a Virtual Meeting
Optimize your whiteboard setup for a virtual meeting. Use tools and tips to bring whiteboarding to your virtual meetings.- “Whiteboarding” is the practice of drawing and writing on a whiteboard. It is a useful tool for explaining ideas and building a shared understanding of a concept or idea.
- Whiteboarding:
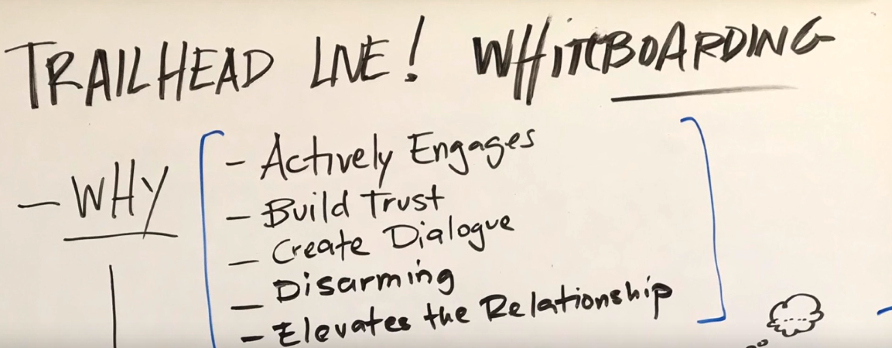
- Engages the audience, because it is interactive and dynamic, unlike a static, long set of slides
- Builds trust, because the whiteboard design is created while having a dialogue, so the activity is shared and therefore builds trust
- Sparks dialogue, because the informal nature of the whiteboard activity creates space for free and open discussion
- Disarms even skeptical audience members, because the presenter draws, writes, and speaks all at the same time, creating content as you go in real-time. Since it is imperfect and human, audiences embrace it
- Ultimately, elevates your relationship with your audience, because engaging, building trust, sparking dialogue, and disarming the audience almost by definition builds a relationship with them
- Set Up and Get the Right Equipment
- Two modalities:
- Online Tool: Use an online tool like Jamboard, or
- Some web conferencing software may already have it included
- Make sure to practice with it before an important meeting
- Classic Whiteboarding: Keep things simple and point your webcam at a physical whiteboard
- Standing whiteboard (24 inches by 36 inches or larger)
- Dry erase marker
- Dry erase board eraser
- Online Tool: Use an online tool like Jamboard, or
- Two modalities:
- Select a Whiteboard Topic
- Look for a topic that has interesting details you can draw, diagram, or list in short sets of bullets
- Consider your audience - best content is tailored to them
- Prepare for a Whiteboarding Session
- There is no glossy, structured set of slides when whiteboarding, so you need to prepare
- Review these preparation tips:
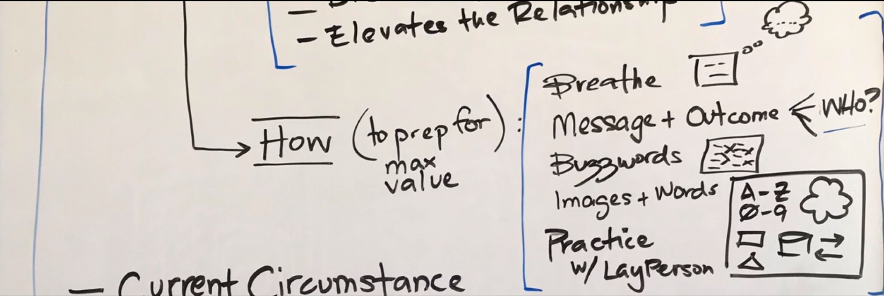
- Clear your mind and take a deep breath, which can help prepare for planning
- Design the right message and specifically be sure you have a good idea of the outcome you’re aiming at
- Eliminate buzzwords as you design your whiteboard content plan, both on the whiteboard and in your “talk track”
- Plan your words and images, but you don’t need to be an artist. Keep your images and words simple and impactful.
- Presenter says he uses only letters, numbers, arrows, and simple shapes, the most complex of which is a cloud
- Practice with a layperson that’s not familiar with your topic to see if your message is landing with a disinterested audience
- Collaborate with Online Whiteboarding Tools
- Enables collaboration - this allows the audience to draw and notate with you in the online space
- WebEx has a native whiteboarding functionality - you can use it in the native desktop client, can also use tablets like iPads
- These tools have built in tools like arrows and a “laser pointer”
- Use a Whiteboard to Maximize Audience Engagement
- Ultimately, this is just a way to get your audience engaged with your ideas
- Consider the following best practices:
- Pause throughout, to let your audience internalize what you just said
- Tee up with teammates, prep your teammates to ask a question or two at the start of the session to kick off the conversation
- Confirm with your audience, keep them visible on your screen so you cans ee their faces and check back in with them
- Ask follow-up questions, to keep the conversation flowing. Good open-ended questions start with “why,” “how,” or “what.”
- Create a “parking lot”, where you can place follow-up items or discussion topics that are ancillary to the overall session
- You do not need to use a physical whiteboard when running a whiteboarding session
- To prepare for your virtual whiteboarding session, you should practice drawing the images you’re going to use